Wednesday, April 30, 2008
Hybrid Scrapping...
And talking about hybrid things. Here's a layout I made which is almost completely hybrid apart from a brad, a few jewels and my white cardstock:
It was created using the most yummy kit by Natalie Braxton and Emily Merritt called "Celebrate The Everyday":
Oh and before I go, I must tell you how I totally L-O-V-E the new Nintendo Wii Fit & Balancing Board. It's just the most fun ever...!
Tuesday, April 29, 2008
Glitter Mania...
Anyway, if you have a moment spare, please pop over to A Trip Down Memory Lane and check out my latest on-line step-by-step class. Lots of photos to show you the process of making it. Thank you :)
Monday, April 28, 2008
Busy, Busy, Busy...
...and somehow on top of all this (and much more than I listed) I want to sign up for this PSE course by Jessica Sprague. I must be mad! LOL! It's not that I want to get into digital scrapping really (love paper too much) but more to get even more familiar with PSE and also I think it will help me with my hybrid work. :) We'll see what I end up doing...
Supplies: Scenic Route papers, Photo frames from "Feb Surprise Cluster pack" by Nancy Comelab, Making Memories flower, Autumn Leaves and October Afternoon stamps, American Crafts Thickers alphabets.
Sunday, April 27, 2008
More Scrapping...
Supplies: Making Memories papers, die-cuts and curling tag, Photocluster from the "Feb Surprise Pack" by Nancy Comelab (the Lilypad), Doodlebug ribbon, American Crafts Thickers alphabets and Autumn Leaves stamp.
Saturday, April 26, 2008
Loving These...
Supplies: Scenic Route "Salem" papers (who said you can only use a Halloween collection for Halloween layouts?! LOL!), "Polaroid Photocluster 02" by Nancy Comelab, American Crafts Thickers alphabets, Love Elsie and Autumn Leaves stamps, Making Memories curling tag and Creative Cafe journaling stickers.
Friday, April 25, 2008
Scrap Your Day...
Shimelle prepared a few kits for the class (though you can do it with whatever supplies you have and since the class is FREE - what have you got to lose? LOL!) and I got up early on the morning they went on sale and managed to get mine. Prepared my book (according to the prompt she e-mailed us who bought it) as soon as the kit arrived so it's been ready to go for a while now.
Really excited about it this morning and as of 09:56 I had already taken 57 photos LOL! I have left the cover for now and will decorate it at a later time. My inside pages have been prepared like Shimelle suggested. Here are some photos of a few of them:
Oh and I almost forgot, Marja and Jackie - you both asked about my little clothes peg bag and where you could get the fabric: Ebay! :)
Thursday, April 24, 2008
My Little Project...
Onto my project... I was in the kitchen drying some dishes the other evening when my eyes fell on these little hooks (for towels, oven gloves etc) we have on the side of a kitchen unit. It suddenly dawned on me that the plastic bag we have for our clothes pegs was not the prettiest sight and that maybe I could so something about it...
So a purchase of fabric and some cord later and I was ready to go. I decided to go for a really happy-summery fabric since clothes pegs are essentially a summer thing...and let's face it, how fun is it to hang washing? So anything to make you smile, right? :) And what better than some cute owls! So out my sewing machine came and this is what I came up with. A simple drawstring bag to hold the pegs.
Much better, eh? And yes I am very aware of that it needs a round with the iron. I'm working on it. Kinda. You know. Sometime it will happen. I think. Maybe.
Wednesday, April 23, 2008
My Opinion On...
Firstly, I have to say that this is something that I would never have bought myself. I'd seen pictures of the tags but they were so poor that I couldn't really work out what they did and how the end result looked. So I went and won the Tag Curler at the MM blog. "Cool" I thought - nice to win a prize. :) But to be honest I still thought it would be one of those tools that would just end up lying unused on a shelf somewhere... Hand on heart - I didn't think I would like it at all.
So yesterday I thought I might as well try it. I grabbed a random ribbon. Okay a ribbon I didn't like (just because I expected it to go in the bin afterwards if I'm being honest here LOL!) And you know what?
I was pretty impressed with the result! :) I can actually see this becoming something I will use quite a bit on layouts and cards. I'm amazed and pretty impressed. I'm not saying you should rush out and buy one - it's not exactly something you *need* in your basic tool kit, but for me - having won this - it's definitely something I will use. And *nearly falls off her chair as she never thought she'd say this* I can even see myself buying some more tags when these run out!! OMG - LOL!!
Leaving you with a little pic of a small project I'm working on at the moment...
Tuesday, April 22, 2008
Loved Doing This...
I used Scenic Route papers, American Crafts Thickers and some leftover alphabet stickers from other brands.
I really love how this concept turned out and I'd love to do something similar as a "yearly" or "monthly" layout - that would be really cool way to show off lots of photos and bring back lots of memories. :)
Monday, April 21, 2008
My Prize...
I had never seen a Making Memories "Tag Curler" in real life as of waking up this morning. In fact I still don't know just how they work or indeed what the finished result is LOL! We have no scrapping shops nearby so I have to get anything I need on-line (can be tricky at times judging colours on the monitor!) and just hope it looks good in real life.
I have to admit that a "Tag Curler" is probably not something I would have ever bought if I had not won this, but it will be fun to try it out and I'm looking forward to have a play with it - hopefully this afternoon. I was pleasantly surprised at how many packs of tags (I thought I would get one) Making Memories had included - very generous of them :)
Oh and do you know what? It's nice and GREEEEEN - yay :)))
Sunday, April 20, 2008
Yummies...
Some yummies by Heidi Grace. She's released several new collections, but you can't buy everything and the "A Bird's Tale" collection was definitely the one that was most for me, so I picked a few selected bits from it (each collection range she does is huuuge LOL!)
And then some random other bits. A few American Crafts Thickers alphabets that I use lots and lots of. Maya Road stamps and rub-ons, SEI papers ad rub-ons etc.
Saturday, April 19, 2008
Guestbook...
I have just kept the pages very simple (so not too much fun to show on here), cardstock photos and the "printables" from Shimelle. I have put the cardstock in the album and cut out the "printables" for the future pages too - that way the whole album will be the same no matter when I finish it. That's why I'm keeping the pages simple. Otherwise it would be easy to use embellishments on the first few pages which I will have run out of when I come to do the later entries.
This is how the cover turned out. Pretty much a copy of Shimelle's cover:
And this is my title page inside - I used a very similar theme to my cover:
Friday, April 18, 2008
Crazy Cards...
A few rounds (okay, *quite* a few!) of Mario Kart on the Wii later - while my brain was busy designing cards - and I had some ideas. Lunch anyone?
The cards have lots of little details that are hard to pick up in the photos. Jewels, liquid pearls, glitter etc...
Again, not really possible to see but there are lots of 3D effects. The hotdog, ice-cream and donut are actually cut out and mounted 3D onto foam.
Oh and I nearly forgot - if you fancy some lunch - check out Kate's doodles that I used. :)
Edited to add: Nina you asked about Scrap-Room and the postage. With my add-ons it's normally about $12-15 (yes US dollars) Hope that helps. If you decide to sign up (you'll love it!!) I'd be very grateful if you'd mention my blog - thanks :)
Thursday, April 17, 2008
Scrap-Room...
Guess what else has arrived with me? The latest Scrap-Room kit. Ad it's a good one! Averaged through all the four part kits, I would say this is my favourite for a while. This is what I got:
...and the embellishment add-on:
...and finally the stamp add-on:
Wednesday, April 16, 2008
Busy...
Then I started this cool guestbook project by Shimelle...
I'm going to do a double spread with info and pics for each time family came to visit/stay from Sweden. Will be a nice thing to have when it's completed. :) I'm going to add some of the visits (that's already taken place) and then half-pre-make the pages for future visits so it's easy just to fill in details and add photos. I have lots and lots of cutting to do and I'm hoping the emergency photos I sent off for from Photobox this afternoon might be here tomorrow...
Tuesday, April 15, 2008
What Do You Do...
But I still can't get along with it even though I like the colours I picked, and I like the concept of the frame. It works at an eye level...but anything else and I don't know if I like it (something with the 3D effect). It's in the bookshelf in our living room at the moment. When I walk past, I think "mmm maybe it's not so bad after all". But then I sit down in the sofa (ie see it from a lower angle) and I instantly am not sure again LOL!
I'm actually working on something at the moment which I'm not sure I like either. Not the best start of the week, eh? LOL!
Monday, April 14, 2008
Monday Scrapping...
Supplies: Papers, die-cuts and stickers by SEI, American Crafts Thickers alphabets, digital paper by Rhonna Farrer, plus some ribbon and ric rac.
I have had a question on my blog (by Justine) and the same question left in a gallery comment at a forum (by Tammy): you were both asking what I use to print my digital images onto, to use on hybrid cards etc. I use very smooth white cardstock. Though you have to be careful with this as some paper and cardstock soak up a lot of ink and the image becomes a bit "fuzzy" looking. So the best thing I can suggest, is to try out a few different types. Also I know some people who swear by printing onto matte photopaper for hybrid stuff. Just give it a try and see what you like best :)
Rhonda - yes the duck pictures you asked about are indeed from IKEA :)
Sunday, April 13, 2008
Scrap Time...
Supplies: Making Memories papers and 3D flowers, American Crafts Thickers alphabets and Doodlebug jewels. Digital paper by Rhonna Farrer.
A while back I bought this fun magazine (well, they call it a "book" but to me it's a "magazine") by Jessica Sprague called "Computer Tricks For Scrapbookers Vol 2" and I decided to follow one of the tutorials. You kinda incorporate journaling next to your photo and then you merge that with a digital paper to create this cool effect:
So the photo goes see-through and you see the paper colour and pattern through it. Pretty funky I think :)
Saturday, April 12, 2008
Quick Update...
Firstly I have used the cloud background paper by Rachel Young from the "Good Day Sunshine" kit. Then some cool birdies and other stuff by Jacque Larsen and a funky doodled frame by Jenna Desai. I have outlined most of the element by pen and added a few of my own doodles & coloured in bits of the frame etc. Oh and some jewels just had to go onto the flower of course :)
Friday, April 11, 2008
Doodle card...
Made this card using Kate Hadfield's "Baby Girl Doodles":
The baby doodle packs she's made are just sooo cute. There's also a boy version and a more neutral one too - just in case you're making the card before the baby is born and you have no idea whether it's a boy or a girl :)
Yesterday I spent making this photobook for my dad - it's a birthday present for next week:
I love making photo books using my Bind-It-All. I cut covers from chipboard. Cover them with cardstock (inside and out) and add a title. Then I use double-sided-tape to put the photos back to back (this takes a looooong time if you have many photos though - this book took me nearly all day LOL!) and then bind it all together. The title of this photo book is "Julen 2007" which means "Christmas 2007".
Thursday, April 10, 2008
Moving Layouts...
Anyway, one of the prompt from the "home" class that I'm taking was about scrapping the "Last time..." of something. Last time when you had visitors, last time you moved etc. I decided to go with the "moving" theme. I printed my photos smaller than normal (to make them less "busy" and hard to scrap with")...two from the old place and two from the new. This is the result:
Supplies: Scenic Route and Making Memories papers, American Crafts Thickers alphabets, Jenny Bowling journaling label and digital Chipboard Buttons by Kate Hadfield.
Thanks so much for all the sweet comments that were left for me yesterday. They really made me smile and cheered me up a bit. *thank you* :)
Wednesday, April 09, 2008
A Better Day Tomorrow...
Supplies: Making Memories papers, clip and 3D flowers, American Crafts Thickers alphabets, Jenny Bowlin ticket stub and journaling block plus some Love Elsie stamps.
Rhonda - Sorry to hear about your mum. Thank you for your sweet comment. I can't believe that I have inspired someone to start scrapbooking and being creative again. That sounds so special and thank you for writing that. It made me smile :) .
Tuesday, April 08, 2008
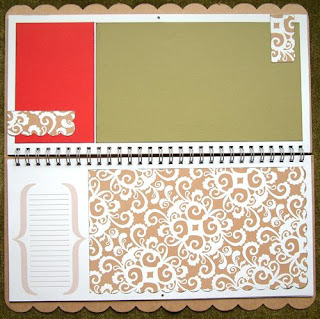
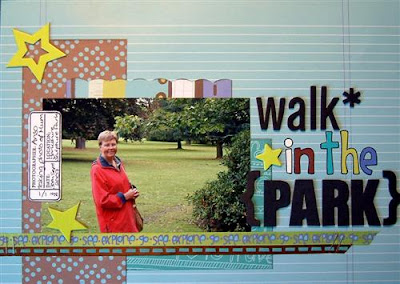
"Walk In The Park" - Layout Class
Supplies needed:
Love Elsie – Toby – “Culture”
Love Elsie – Toby – “Thoughts”
Love Elsie – Toby – “Carry On”
Love Elsie – Toby – Big ribbon pack
Love Elsie – Toby – Tiny ribbon pack
Love Elsie – Toby – alphabet cardstock stickers
October Afternoon – Candid Camera stampset
American Crafts – Thickers – Latte, Foam, Black
American Crafts – Thickers – Daiquiri, Foam, Black
American Crafts – Playhouse Chipboard Stars
Also needed:
Glue (I use Herma removable)
Black Slick Writer
Charcoal Chalk Inkpad (optional)
Stapler
Scalloped scissors (optional)
Scrap piece of white cardstock
Start by cutting your patterned paper (“Culture”) to size. I scrap in true A4 size, so I cut mine to 29,7x21 centimetres (cm). Please feel free to adapt to another layout size if you prefer. We will be using the striped side of the paper for the base of the layout.
Also pick your photo. I’m using a standard 15x10 cm (6x4) photo in a landscape format. If you’re working on a bigger sized layout (say 12x12) then a larger photo would also work great.
Get your patterned papers and cut the following:
• 18x7,5 cm piece from “Culture”
• 11x9,5 cm piece from “Thoughts”
• 12x3 cm piece from “Carry On”
Use the scalloped scissors on one of the long sides of your “carry On” piece. Then use the chalk inkpad on the edges of all pieces. Attach onto layout as shown in photo below (the long strip of “Culture” starts 1,5 cm in from the left side of my layout). Attach your photo in place.
Pick two ribbons that you like. I picked the “go, see, explore” from the big ribbon set and a brown ribbon from the tiny ribbon set. My green ribbon is 27 cm long and the brown 25 cm. I have cut them at an angle on the right edge. Attach along the bottom of your layout and staple in place. Use the Thickers and Toby chipboard stickers to make up a title of your choice. I like to outline my stickers with a black Slick Writer so they stand out better.
Finally add some chipboard stars. I picked three lime green ones. Pick a suitable stamp from the set, stamp onto your piece of scrap white cardstock, fill in with details, edge with chalk ink and attach along the left side of the photo.
I hope you enjoyed my class! Wishing you lots of fun creating your own version!
Monday, April 07, 2008
Lilypad Goodies...
I used the Vehicle Doodles pack by Kate Hadfield. The tractor is originally green in the download pack, but I needed a red one so I had to re-colour it. Worked great :)
Then I played with some of the new April Collab kit. I had this idea the other day to make matchboxes a bit more pretty, so I grabbed some this morning and had a go. This is the result:
The super cute owls are from Natalie Braxton's "Hoo Do You Love?" and the backgrounds are papers from Amy Wolff's "Barely There". Borders are hand doodled.
Sunday, April 06, 2008
Another Scraproom Layout...
Supplies: Love Elsie "Zoe" papers, cardstock stickers and epoxy stickers, American Crafts Thickers of different fonts, doodlebug jewels plus black & white pens.
Jennifer - you asked about the dimensions of the "My Home Town" minibook. I have just measured and it's 8,5 cm by 9,5 cm. :)
Can't wait to see what tomorrow's prompt has in store for us. So far I'm totally loving this class :)