
So this class was all about the things you have to do on a day to day basis. And how to create more time for things you love...like scrapping. If you're a busy mum with several kids, lots of activities etc, I would really recommend this class to you.
.jpg) ...anyway, now I'm going off track here a bit! LOL! So I was doing my own thing. And I was trying to put into words why or how I can get more scrapping done. I sat down with a pen and paper and started to scribble. Soon I had 6 reasons which I changed a bit until I was happy with my plans.
...anyway, now I'm going off track here a bit! LOL! So I was doing my own thing. And I was trying to put into words why or how I can get more scrapping done. I sat down with a pen and paper and started to scribble. Soon I had 6 reasons which I changed a bit until I was happy with my plans..jpg) ... and "The Rules For Getting More Scrapping Done" had emerged. Once I had my 6 "rules" written down, I started to think about the format. I was tempted to go for something small and round, but then I remembered the drink coasters (beermats) that I had in my drawer and decided that they would be a good size for my little book.
... and "The Rules For Getting More Scrapping Done" had emerged. Once I had my 6 "rules" written down, I started to think about the format. I was tempted to go for something small and round, but then I remembered the drink coasters (beermats) that I had in my drawer and decided that they would be a good size for my little book..jpg)
.jpg) I used lots of Chatterbox papers, yellow and white ric rac, a little chain and some black chalk ink. And my printer of course! The back is done using Catslife stamps.
I used lots of Chatterbox papers, yellow and white ric rac, a little chain and some black chalk ink. And my printer of course! The back is done using Catslife stamps. .jpg)
.jpg) I signed up for the instant (ie. you pay and you get access to it straight away) Big Picture Class called
I signed up for the instant (ie. you pay and you get access to it straight away) Big Picture Class called .jpg) I'm working on a layout at the moment. Which, to be honest, I had hoped to have ready by now (and possibly uploaded here), but I really can't get it right. So I'm leaving it alone for a little while with hope that I will have some genius (we can hope, can't we?! LOL!) idea very soon...
I'm working on a layout at the moment. Which, to be honest, I had hoped to have ready by now (and possibly uploaded here), but I really can't get it right. So I'm leaving it alone for a little while with hope that I will have some genius (we can hope, can't we?! LOL!) idea very soon....jpg)
.jpg) Ross bought me this cute little thing called an iDog from ASDA yesterday (it was a "special purchase" and only £10!!) which I just loooove! He's named Buster and he's just the cutest!! Not to mention how well he goes with my little
Ross bought me this cute little thing called an iDog from ASDA yesterday (it was a "special purchase" and only £10!!) which I just loooove! He's named Buster and he's just the cutest!! Not to mention how well he goes with my little .jpg)
.jpg) Don't you just hate it when the postman comes early on a Saturday and wake you up?!! Especially when he doesn't normally come the right side of lunchtime Monday to Friday. But I guess when he brings you stash you don't mind...
Don't you just hate it when the postman comes early on a Saturday and wake you up?!! Especially when he doesn't normally come the right side of lunchtime Monday to Friday. But I guess when he brings you stash you don't mind....jpg) I can't get enough of the Heidi Swapp chipboard alphabets at the moment. They are so useful for titles and titles have been the biggest thing for me lately that I get stuck on when I scrap. I have nearly the whole page done and I just can't find a good way to add the title so it stands out etc.
I can't get enough of the Heidi Swapp chipboard alphabets at the moment. They are so useful for titles and titles have been the biggest thing for me lately that I get stuck on when I scrap. I have nearly the whole page done and I just can't find a good way to add the title so it stands out etc..jpg) This is another LO that I have just made. Papers are KI Memories and the chipboard letters are Heidi Swapp.
This is another LO that I have just made. Papers are KI Memories and the chipboard letters are Heidi Swapp. .jpg)
.jpg) Talking about playing...I really can't wait until the Big Picture Scrapbboking class "Product Playground" starts - not long now. In fact, I better go and check that it really starts on the 1st of Feb and it's not only me assuming that! LOL!
Talking about playing...I really can't wait until the Big Picture Scrapbboking class "Product Playground" starts - not long now. In fact, I better go and check that it really starts on the 1st of Feb and it's not only me assuming that! LOL!.jpg)
.jpg)
.jpg)
.jpg)
.jpg)
.jpg)
.jpg) ...and I got my new Banana Frog stamps. Yummy!! I soooo love these stamps. And because of the offer, I got a free binder to hold the stamp sets in - doesn't it just look so great? :)
...and I got my new Banana Frog stamps. Yummy!! I soooo love these stamps. And because of the offer, I got a free binder to hold the stamp sets in - doesn't it just look so great? :).jpg) These are the stamp sets that I got in the post today (it was two separate orders but they both arrived today - so I'm a very happy girl!!):
These are the stamp sets that I got in the post today (it was two separate orders but they both arrived today - so I'm a very happy girl!!):.jpg)
.JPG)
.JPG)
.jpg)
.jpg)
.jpg)
.jpg)
.jpg)
.jpg)
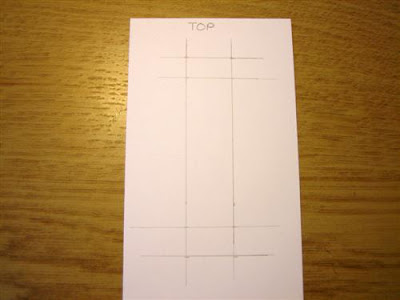
.jpg) 10. Time to make the tie. Don’t get put off by how “complicated” it looks. We’re taking it one step at a time which makes this really easy. This is the type of sketch you will come up with in the end (see below). I find it’s easy if you draw this on a scrap piece of white card which you can use as your template for cutting your patterned paper. By the way, my lines ARE straight, but I often had to angle the camera so they don’t look straight just to get the camera to focus properly on the very white paper.
10. Time to make the tie. Don’t get put off by how “complicated” it looks. We’re taking it one step at a time which makes this really easy. This is the type of sketch you will come up with in the end (see below). I find it’s easy if you draw this on a scrap piece of white card which you can use as your template for cutting your patterned paper. By the way, my lines ARE straight, but I often had to angle the camera so they don’t look straight just to get the camera to focus properly on the very white paper. .jpg)
.jpg)
.jpg)
.jpg)
.jpg)
.jpg)
.jpg)
.jpg)
.jpg)
.jpg)
.jpg)
.jpg)
.jpg)

.JPG) Papers are Fontwerks, small chipboard and arrow is Heidi Swapp. The large "MUM" chipboard letters are painted with acrylic white paint and then I have used a black Millennium pen and doodled over them. I never have the patience to sketch the doodles out in pencil first, so I just go for it and hope that I don't make any mistakes! LOL!
Papers are Fontwerks, small chipboard and arrow is Heidi Swapp. The large "MUM" chipboard letters are painted with acrylic white paint and then I have used a black Millennium pen and doodled over them. I never have the patience to sketch the doodles out in pencil first, so I just go for it and hope that I don't make any mistakes! LOL! .jpg) Instead I made a smaller page, which I glued onto the inside of the back cover of my journal. I only wanted it to sum up why I did the journal in the first place. So I didn't really need that much space for journaling or anything. I have used huge bookrings and the finished journal is about 8 centimetres (3 inches) thick!!!
Instead I made a smaller page, which I glued onto the inside of the back cover of my journal. I only wanted it to sum up why I did the journal in the first place. So I didn't really need that much space for journaling or anything. I have used huge bookrings and the finished journal is about 8 centimetres (3 inches) thick!!!.jpg) I can't believe that's it. I know I have said I didn't really enjoy doing the last few pages as it felt a bit strange to do Christmas things now. But today, adding the last few bits to my journal I feel a bit like "now what?" LOL! Maybe I will finally have time to read my latest issues of Creating Keepsakes and Scrapbooks Etc properly! And it will be nice to getting back to making some "proper" layouts again too...
I can't believe that's it. I know I have said I didn't really enjoy doing the last few pages as it felt a bit strange to do Christmas things now. But today, adding the last few bits to my journal I feel a bit like "now what?" LOL! Maybe I will finally have time to read my latest issues of Creating Keepsakes and Scrapbooks Etc properly! And it will be nice to getting back to making some "proper" layouts again too....jpg) Looking out of the window, the weather is C-R-A-Z-Y here today!!! It's so wet and dark and I really can't find words to describe just HOW windy it is here!!! I'm amazed the house is still standing. Bins have blown everywhere into the streets here, car alarms are constantly going off and I keep hearing sirens almost all the time (and no, I'm not joking!). Sitting here feeling a bit worried because Ross is driving all the way up from London as I type this after being on a course. Not happy with him being on the roads for hours when the weather is like this. I spoke to him earlier on the phone and he said the traffic news, which is normally a minute or so was over 10 (!!) minutes long because of the bad weather and all the problems it's causing. Not good, not good at all...
Looking out of the window, the weather is C-R-A-Z-Y here today!!! It's so wet and dark and I really can't find words to describe just HOW windy it is here!!! I'm amazed the house is still standing. Bins have blown everywhere into the streets here, car alarms are constantly going off and I keep hearing sirens almost all the time (and no, I'm not joking!). Sitting here feeling a bit worried because Ross is driving all the way up from London as I type this after being on a course. Not happy with him being on the roads for hours when the weather is like this. I spoke to him earlier on the phone and he said the traffic news, which is normally a minute or so was over 10 (!!) minutes long because of the bad weather and all the problems it's causing. Not good, not good at all...

