Well yesterday afternoon turned out to be a nice day!! I got stash! And not one parcel but two! :)) One of my orders from the US turned up. Some chipboard letters, packs of rub-ons, brads, stickers and lots of yummy Urban Lily paper including these two really cool sheets where you cut them up and make them into cute little minibooks...
.jpg)
Also I got April's Scrap-Room kit! Yum, yum, yum! I really liked this one. The photo does not do it justice at all. Honestly! Can't wait to scrap with them...
.jpg)
Then there was the embellishment add-on for the kit. Goes great with the SEI papers etc. And who can resist some funky flowers!!
.jpg)
And finally the month's stamps. And yes I say stampS. It does look like one stamp doesn't it? But it's really cleverly made so it's actually three stamps in one. The frame is a stamp by itself, so is the "top ten" and the numbered list. This could be soooo useful...
.jpg)
We've had a chipboard storage discussion on a forum I'm on. How do YOU store your chipboard? I'd love, love, love it for you to leave a comment on this post and tell me - thank you :)
It all comes in different "awkward" packagings, doesn't it? Little packs with chipboard embellishments in different sizes... Then you have the coloured sheets of Heidi Swapp alphabets... "Undressed/nude" sheets of chipboard shapes and alphabets from companies like Bazzill, Fancy Pants etc...all in different sizes.
I have to confess to not having a good solution to storing mine... I have some small packets of chipboard letters here and there, a pack of Heidi Swapp hearts just next to my keyboard as I type this (lacking good idea of where to keep it!) and sheets of alphabets in a cardboard box (and not even a nice one...a plain old brown cardboard box with the flaps cut off
) together with my stamps in flat packs (like Autumn Leaves etc)... *confession time over*

.jpg)
.jpg) This was a tiny minibook class by Shimelle for the UKS cyber crop and I had so much fun!! Before the class started I was totally worn out from all the non-stop scrapping. But as soon as I started on this project I knew I really enjoyed it and it gave me new energy! The book is about 15 pages and I completed the whole thing in only 40 minutes. That gives you a great feeling of satisfaction!!
This was a tiny minibook class by Shimelle for the UKS cyber crop and I had so much fun!! Before the class started I was totally worn out from all the non-stop scrapping. But as soon as I started on this project I knew I really enjoyed it and it gave me new energy! The book is about 15 pages and I completed the whole thing in only 40 minutes. That gives you a great feeling of satisfaction!!.jpg) This is the bookmark I just completed for a....eh...bookmark challenge LOL! I have used Bazzill cardstock, Scenic Route papers, Li'l Davies rub-ons, some little jewels and a MOD chip.
This is the bookmark I just completed for a....eh...bookmark challenge LOL! I have used Bazzill cardstock, Scenic Route papers, Li'l Davies rub-ons, some little jewels and a MOD chip..jpg) Right I'm off to prepare for the cyber crop over on UKS...clear off two or three things off my desk, load up my printer with more paper, load all my Herma dispensers, have a shower and wash my hair etc. I used to be really obsessive with the cybercrops and had have each class prepared down to the last brad. Do every class and every challenge etc. I'm not joking! Since then I have learnt not to do things "just for the crop". I will do thngs my way - that way I get most out of the crop. Not sure I will do the challenges this time unless something really appeals to me. But the classes I will do. If you can call it "doing them". I never read any instructions anymore, just look at the finished layout and let that inspire me to create something. Then it works for me. I do something that is "me" and something that I will enjoy having in my album rather than having ended up with something possibly "just done for the crop". Anyway... It starts this evening and I just can't wait...
Right I'm off to prepare for the cyber crop over on UKS...clear off two or three things off my desk, load up my printer with more paper, load all my Herma dispensers, have a shower and wash my hair etc. I used to be really obsessive with the cybercrops and had have each class prepared down to the last brad. Do every class and every challenge etc. I'm not joking! Since then I have learnt not to do things "just for the crop". I will do thngs my way - that way I get most out of the crop. Not sure I will do the challenges this time unless something really appeals to me. But the classes I will do. If you can call it "doing them". I never read any instructions anymore, just look at the finished layout and let that inspire me to create something. Then it works for me. I do something that is "me" and something that I will enjoy having in my album rather than having ended up with something possibly "just done for the crop". Anyway... It starts this evening and I just can't wait...
.jpg)
+(2).jpg) Supplies needed:
Supplies needed:+(2).jpg) Then cut the line carefully with a craftknife or scissors.
Then cut the line carefully with a craftknife or scissors.+(2).jpg) Insert the photo where you have cut and glue in place.
Insert the photo where you have cut and glue in place.+(2).jpg) Take your chipboard flowers and work out what you’d like on your layout. I sometimes took two flowers and layered them on top of each other to create dimension and a different look. In the centres, either place a brad or attach a button with some glue. Pick the rub-on you like best from the Basic Grey sheet and place in bottom right corner, slightly diagonally and overlapping your photo a little if you like.
Take your chipboard flowers and work out what you’d like on your layout. I sometimes took two flowers and layered them on top of each other to create dimension and a different look. In the centres, either place a brad or attach a button with some glue. Pick the rub-on you like best from the Basic Grey sheet and place in bottom right corner, slightly diagonally and overlapping your photo a little if you like.+(2).jpg) Write your journaling on the 7Gypsies card (I chose to cut away the little pre-printed text, but you can of course leave this on if you like). Place this, the flowers (see finished layout for suggested placement) and a few buttons (randomly around the photo) on your layout. Do NOT attach yet. You are placing these only to see where you want to do your sewing.
Write your journaling on the 7Gypsies card (I chose to cut away the little pre-printed text, but you can of course leave this on if you like). Place this, the flowers (see finished layout for suggested placement) and a few buttons (randomly around the photo) on your layout. Do NOT attach yet. You are placing these only to see where you want to do your sewing.+(2).jpg) Now get your needle and black thread and do the stitching in the holes you just pierced, and when you come to one of your buttons you just sew that in place too. (I used all 6 strands of my embroidery thread to sew with.)
Now get your needle and black thread and do the stitching in the holes you just pierced, and when you come to one of your buttons you just sew that in place too. (I used all 6 strands of my embroidery thread to sew with.)+(2).jpg) I hope you enjoyed my class! Wishing you lots of fun creating your own version!
I hope you enjoyed my class! Wishing you lots of fun creating your own version!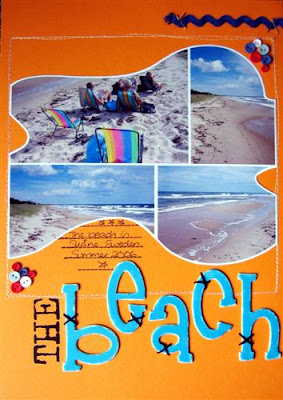.jpg) Because of the photo shape I wanted to keep the layout quite clear and uncluttered so the photo could be the main focal point and I hope/think I have achieved this. I keep wondering if it's too plain, but I'm resisting the urge to add some more to it LOL! Can you believe that a year ago I would never EVER have scrapped a bright orange layout!! Sorry I have got some funny light in the picture - the top of the layout should not be that dark. Supplies are: Bazzill Doodlebug cardstock, Pressed Petals chipboard letters, Autumn Leaves "Stitched Panels" journaling stamp, Zig Millennium pen and some buttons, ric rac & embroidery thread. Oh and my sewing machine of course - love it!!
Because of the photo shape I wanted to keep the layout quite clear and uncluttered so the photo could be the main focal point and I hope/think I have achieved this. I keep wondering if it's too plain, but I'm resisting the urge to add some more to it LOL! Can you believe that a year ago I would never EVER have scrapped a bright orange layout!! Sorry I have got some funny light in the picture - the top of the layout should not be that dark. Supplies are: Bazzill Doodlebug cardstock, Pressed Petals chipboard letters, Autumn Leaves "Stitched Panels" journaling stamp, Zig Millennium pen and some buttons, ric rac & embroidery thread. Oh and my sewing machine of course - love it!!
.jpg) Suddenly discovered this morning that it's this weekend that the cyber crop is held over on UKS. I mean, I knew it was coming...it just felt like it was ages away. Fortunately I'm well stocked up on Herma since the other week so I'm ready to go. The first few cybercrops I did I had everything planned. And I mean EVERYTHING. Supplies for each class (with appropriate photos) in it's own ziplock bag etc. Since then I have learnt that I like to do my own thing. I don't even read the instructions to a class. I just look at the finished layout and let that inspire me to do something. That's how I know I will do something that is "me" and something that I will definitely be happy about rather than just "having done it for the class". Hope that makes sense. LOL! So now all I do is to make sure I have glue etc, a clear desk and that Ross can "look after me" during the weekend (=bring me food, water and cuddles).
Suddenly discovered this morning that it's this weekend that the cyber crop is held over on UKS. I mean, I knew it was coming...it just felt like it was ages away. Fortunately I'm well stocked up on Herma since the other week so I'm ready to go. The first few cybercrops I did I had everything planned. And I mean EVERYTHING. Supplies for each class (with appropriate photos) in it's own ziplock bag etc. Since then I have learnt that I like to do my own thing. I don't even read the instructions to a class. I just look at the finished layout and let that inspire me to do something. That's how I know I will do something that is "me" and something that I will definitely be happy about rather than just "having done it for the class". Hope that makes sense. LOL! So now all I do is to make sure I have glue etc, a clear desk and that Ross can "look after me" during the weekend (=bring me food, water and cuddles).
.jpg) Got some magazine questions yesterday so here we go:
Got some magazine questions yesterday so here we go:.jpg) ...I started to separate them first in to piles of which magazine they were. Then in to year piles. And finally I sorted each pile into order and put them into magazine holders. And ----> aaaah we have this... Yes!!!!
...I started to separate them first in to piles of which magazine they were. Then in to year piles. And finally I sorted each pile into order and put them into magazine holders. And ----> aaaah we have this... Yes!!!!.jpg) So tell me please, how do you organise (or not!?) and store your magazines? And which scrapping magazines do you buy? Would love to hear about it! I try to be good and "only" stick to two magazines - so it's Creating Keepsakes and BHG Scrapbooks Etc for me.
So tell me please, how do you organise (or not!?) and store your magazines? And which scrapping magazines do you buy? Would love to hear about it! I try to be good and "only" stick to two magazines - so it's Creating Keepsakes and BHG Scrapbooks Etc for me..jpg)
.jpg) Hrm...not obvious that I like "Slick Writers" a lot, is it?! LOL! Well at least I haven't confessed exactly HOW much I like my "Slick Writers"... *quickly hides the other 20 pens*
Hrm...not obvious that I like "Slick Writers" a lot, is it?! LOL! Well at least I haven't confessed exactly HOW much I like my "Slick Writers"... *quickly hides the other 20 pens*.jpg) And how cool are these little plastic flowers...
And how cool are these little plastic flowers....jpg) Transparency ribbons - will it be the new thing? Love these...
Transparency ribbons - will it be the new thing? Love these....jpg) I have spent the last hour going through the first few tutorials and already learnt a lot of cool things to do to your photos!!
I have spent the last hour going through the first few tutorials and already learnt a lot of cool things to do to your photos!!.jpg)
.jpg)
.jpg) Today I have done some scrapping for the first time in my "new room". Okay so it's not new, but it feels like it's new with all the new organisation. Though I guess it will take me a while to remember where everything is again! LOL!
Today I have done some scrapping for the first time in my "new room". Okay so it's not new, but it feels like it's new with all the new organisation. Though I guess it will take me a while to remember where everything is again! LOL!.jpg) The layout I have made using Scenic Route "Laurel" papers and chipboard. And the journaling goes like this:
The layout I have made using Scenic Route "Laurel" papers and chipboard. And the journaling goes like this:.jpg)
.jpg)
.jpg) You can buy the supplies needed to make it at
You can buy the supplies needed to make it at .jpg) And can I just say: thanks for visiting my blog! It makes me really happy that you - yes YOU! - took the time to visit my blog! So thank you very much! Wishing you all a great weekend and please stop by again when you have a spare moment :)
And can I just say: thanks for visiting my blog! It makes me really happy that you - yes YOU! - took the time to visit my blog! So thank you very much! Wishing you all a great weekend and please stop by again when you have a spare moment :).jpg)
.jpg) Papers are by Chattebox, Bazzill cardstock, Heidi Swapp chipboard alphabet, Chatterbox rub-ons, Autumn Leaves/Rhonna Farrer stamps and some scraps of ribbon.
Papers are by Chattebox, Bazzill cardstock, Heidi Swapp chipboard alphabet, Chatterbox rub-ons, Autumn Leaves/Rhonna Farrer stamps and some scraps of ribbon.
.jpg)
.jpg)
.jpg)
.jpg)
.jpg) Talking about happy. This is a layout of a photo I took of a very happy Ross when he got his hands on the brand new Nintendo Wii in December. Patterned paper, arrow, chipboard etc is by Scenic Route and the stamp is by Fontwerks.
Talking about happy. This is a layout of a photo I took of a very happy Ross when he got his hands on the brand new Nintendo Wii in December. Patterned paper, arrow, chipboard etc is by Scenic Route and the stamp is by Fontwerks..jpg)
.jpg)
.jpg)
.jpg) I made a layout this morning based on a page for the 3rd of April in the "Designing With..." calendar by Autumn Leaves. Brown cardstock is Bazzill, the patterned papers are by American Crafts, Glossy Accents on the circles and arrow. The arrow is by Scenic Route. Here's the journaling:
I made a layout this morning based on a page for the 3rd of April in the "Designing With..." calendar by Autumn Leaves. Brown cardstock is Bazzill, the patterned papers are by American Crafts, Glossy Accents on the circles and arrow. The arrow is by Scenic Route. Here's the journaling:.jpg) So this is what I came up with. Bazzill cardstock, American Crafts paper (the cut flowers), Junkitz photo anchors + brads, ric rac, Scrap-Room journaling stamp, Heidi Swapp word stamp and Scenic Route round chipboard arrow.
So this is what I came up with. Bazzill cardstock, American Crafts paper (the cut flowers), Junkitz photo anchors + brads, ric rac, Scrap-Room journaling stamp, Heidi Swapp word stamp and Scenic Route round chipboard arrow..jpg)
.jpg) I got some questions in the "comments" sections yesterday so here we go:
I got some questions in the "comments" sections yesterday so here we go:.jpg) Anyway, back to my "week 3" layout. I have to say I really struggled with the PDF. Reading some of the grammar parts I really felt lost...like I was reading Greek (ie didn't understand a thing). Okay so English is not my first language and I guess it's totally understandable that something like that would be difficult for me. Yet it's so difficult not to be too hard on yourself when you just don't get something. I have to admit to being close to giving up...
Anyway, back to my "week 3" layout. I have to say I really struggled with the PDF. Reading some of the grammar parts I really felt lost...like I was reading Greek (ie didn't understand a thing). Okay so English is not my first language and I guess it's totally understandable that something like that would be difficult for me. Yet it's so difficult not to be too hard on yourself when you just don't get something. I have to admit to being close to giving up... .jpg) Then I just got really determind and sat down with pen and paper and wrote down each sentence of my journaling as I went along and worked things out. And I did it - I got my journaling done!! To be honest I'm not sure I got it 100% right (maybe I did, maybe I didn't)...I really don't know. But I guess what matters is that I tried, I did it and I didn't give up on it just because it seemed impossible for me to understand. I improved my journaling from how I first would have written it and that means I achieved something good! So ---> yay for that! LOL!
Then I just got really determind and sat down with pen and paper and wrote down each sentence of my journaling as I went along and worked things out. And I did it - I got my journaling done!! To be honest I'm not sure I got it 100% right (maybe I did, maybe I didn't)...I really don't know. But I guess what matters is that I tried, I did it and I didn't give up on it just because it seemed impossible for me to understand. I improved my journaling from how I first would have written it and that means I achieved something good! So ---> yay for that! LOL!.jpg)


