
Please feel free to use these instructions to make your own boxes. You are free to link to this page from any forum etc if you wish. Please do NOT copy this information and/or photos to use for your own classes/forums/webpages without permission. Please also note that I'm not claiming that I have invented the exploding box, but these simple step-by-step instructions and photos are mine.
Class Supply list:
For the box you will need:
* 3x 12x12 sheets of cardstock
For the lid you will need:
* 1x 12x12 sheet of cardstock (though this can be A4 also, you only need a 6 ¼”x6 ¼” piece)
Tools:
* trimmer
* scissors
* scoring tool, like a bone folder etc, or the scoring blade if you have a Zision trimmer or similar
* glue (I would recommend double-sided tape PLUS a wet glue like Glossy Accents, Diamond Glaze etc)
* 4 paperclips (to hold card in place while drying) – optional
* corner rounder – optional
* inkpad for edges of card - optional
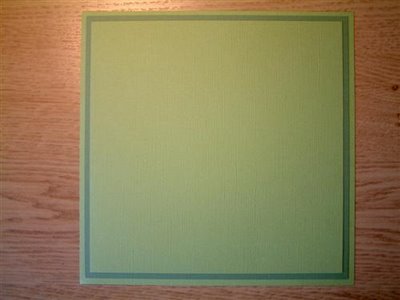
I would recommend that your four sheets are either exactly the same colour, or different shades of the same colour. Of course, if you want more of a rainbow effect (!) you could use four sheets of totally different colours. I have used two different shades of green Bazzill. The class with mainly focus on how to make the exploding box itself. However I will also supply some photos of my finished box.
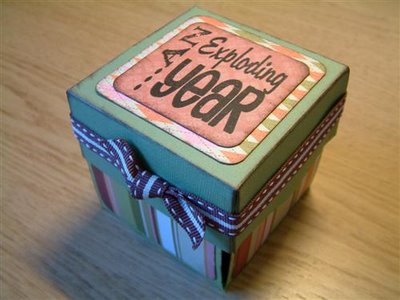
If you wish to continue after the class and decorate your box you will need: about 5-6 sheets of co-ordinating patterned paper (assuming you want to cover the “pages”) up to 26 small photos (assuming: one on each “flap”(front and back), one in the middle of the box and one on the top of the lid) ribbon to go around the lid (optional) any other embellishments etc that you want to use. The class is called “An Exploding Year” because my box will feature “random” photos from the past year…so it’s kind of like a summary of a “year in a box”.
First of all – please don’t be put off by how long the instructions are. It’s only because I have made them VERY simple and step-by-step with lots of pictures. Making the box and lid (not decorated) only took me 30 minutes. And then I had to stop all the time to take photos of the different stages.
Normally I work in metric, but for making this box it’s actually easier to make it using inches…so that’s what we’ll do. Ready?
1. First we’ll do the box itself. Take your three sheets of cardstock and cut them as follows:
• one sheet to 9 x 9 inches
• one sheet to 8 5/8 x 8 5/8 inches
• one sheet to 8 ¼ x 8 ¼ inches
 2. Now score each sheet according to the measurements below. You score on all four sides (see photo below).
• score the 9 x 9 sheet, 3 inches in from each side
• score the 8 5/8 x 8 5/8 sheet, 2 7/8 inches in from each side
• score the 8 ¼ x 8 ¼ sheet, 2 ¾ inches in from each side
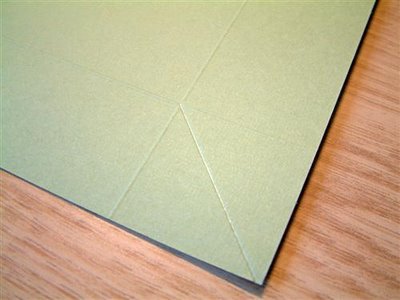
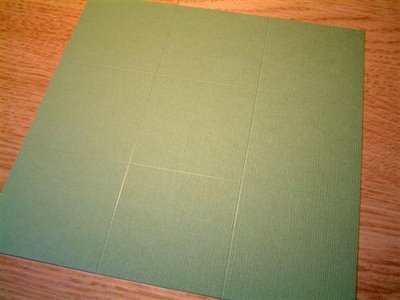 3. Following your scored lines, cut off all four corners on all three pieces.
 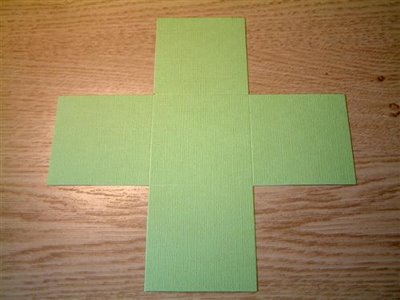 4. At this point (and this is optional) you might want to ink the edges (don’t forget to do both sides!) and/or round the corners.
 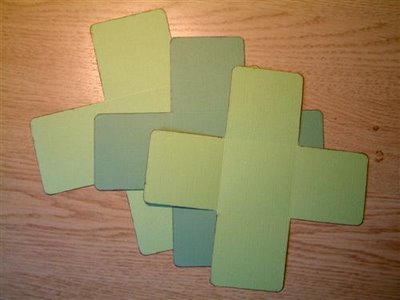 5. Now you need to glue together your pieces. It’s easiest if you start by putting the smallest piece on to the middle piece and then the medium (+smallest) piece onto the largest one. I would suggest you use double-sided tape for this. You ONLY put your tape/glue on the MIDDLE square. Like this:
 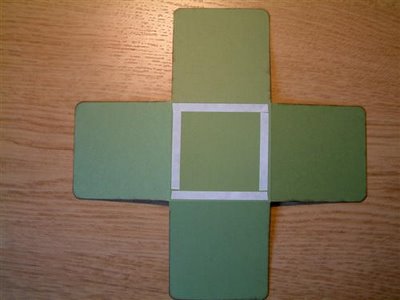 …and don’t forget you do NOT need glue on the back of your largest piece. Once you have put them together, you should end up with something looking like this:
 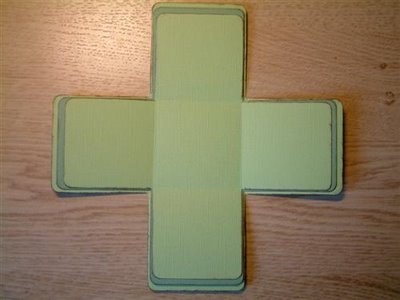 6. Fold up the edges of your scored lines.
 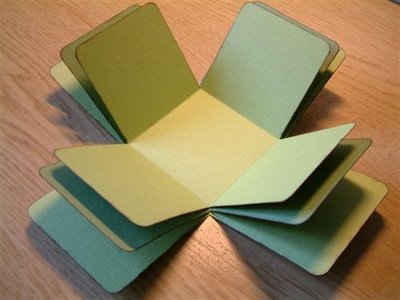 7. Now you can put the box to one side. It’s finished for you to continue decorating now or later. Onto the box lid:
8. Take your piece of cardstock for the lid and cut it to: 6 ¼ x 6 ¼ inches
9. Now score the lid, 1 ½ inch in from each of the four edges.
 10. Right, this might be a bit tricky to explain in words, but the photo below should help you. TURN YOUR CARD OVER and you need to score from the tip of each corner, diagonally, until you meet your scored “corner” lines. See photos:
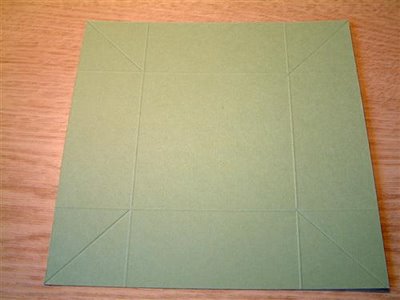
 11. Fold all your scorelines and pinch the corners and fold them inwards. See photo:
 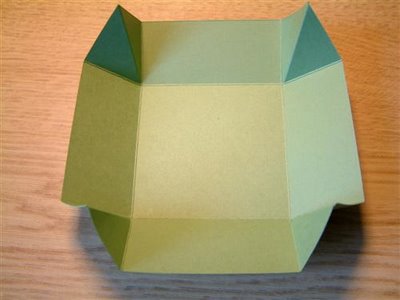 12. Glue the corners in place. I found that double-sided tape was NOT strong enough for this (it holds for a little while and then lets go) so I would recommend a wet glue, something like Glossy Accents or Diamond Glaze for this. You can either hold the corners for a little minute until the glue is dry enough to hold the corners in place, or you can use some paperclips to hold the corners in place while drying.
 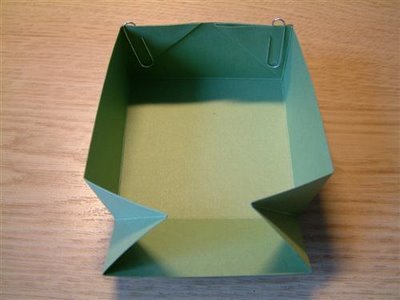 ...your lid should now be finished and look like this:
 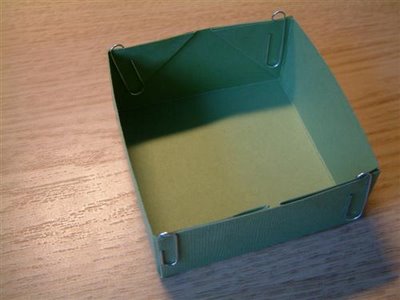 And your finished complete box should look something like this:
 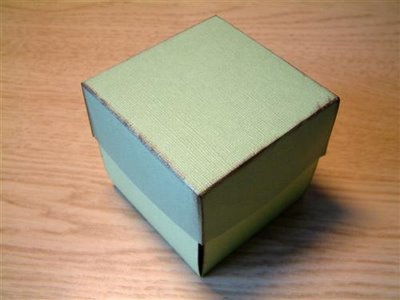 If you want to continue decorating your box, I would recommend the following measures for your paper (I’m swapping to metric now since it’s easier to be more exact):
• one 7,5x7,5 centimetre square for the top of the lid
• one 6,5x6,5 centimetre square for the centre inside your box
• eight 7x7cm squares for your largest “pages”
• eight 6,7x6,7cm squares for your medium “pages”
• eight 6,5x6,5 cm squares for your smallest “pages”
Round your corners and/or chalk your edges if wanted.
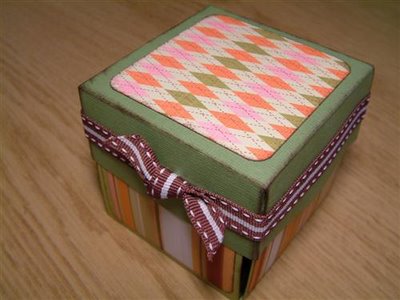
I have used Chatterbox papers for mine and this is what my box looks like decorated:
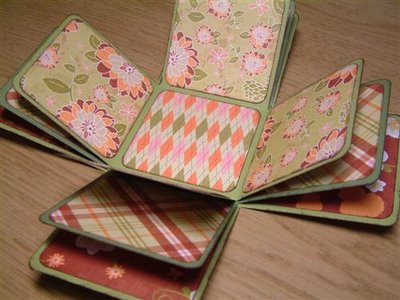 I have used small photos in mine. I used 20 photos in my box. One on each page (not on the lid, centre square, or the four sides that makes up the outside of the box) and I printed my photos: 8 photos to a 15x10cm photo (6x4 inches). Very easy if you have an Epson PictureMate. Each little photo measures: 5x4 cm.
And here is my finished box:
 I hope you have enjoyed my class and thank you so much for taking it!
Anso


310 comments:
1 – 200 of 310 Newer› Newest»thank you Anso - this was a fabulous class and made the boxes so easy!!
Thanks for sharing the instructions Anso, I feel inspired to give it a go :)
Thank you for such clear instructions - guess what I'll be doing later this week!
Chris x
Fab! Saw this link on UKS and strangely enough I'm about to attempt my first box - these instructions will be super!
Thanks.
Thank you for sharing this class. I am going to have a go at your class. I would love to be able to use your instructions in our crop if you wouldn't mind? and possibly also in school if we collapse the timetable
Thanks for posting on UKS regarding your instructions here, Anso. They are really the easiest I have found and I'll give it a go on Saturday after I have been craft shopping!!! :)
This is great I made one when you put the instructions on Uk's Thanks alot
Barbara
Thanks for the superb instructions Anso - will now give it a go!
Thank you so much Anso, can't wait to have a go :)
Cath x
Hi Anso, I've made my box the lid is glueing and I'm really enjoying myself decorating the box with papers. Now off to see which photos to use.
Thanks for the great instructions. Very easy to follow.
thank you so much for putting this on your blog ! Must try this soon !
fantastic instructions anso - thanks!
Cool instuctions Anso, thanks hun! Just what I need as I battle to figure out how things are made just from photos of something, i need the simple guide, lol.
Anso - i found this through UKS too, I've been wanting to make one for ages and now think I have the guts to give it a try!! Thanks! (You should be on Blue Peter you know!!)
Trace
Thanks so much for posting these instructions Anso! It looks absolutely brilliant and I will definatly giving this class a go!
:)
Wow! I love your Exploding Box. I am definitely going to give it a go. Thank you so much for such a fantastic set of very easy to follow instructions.
Lynn Morgan
Hi thank you so much I was directed here by a friend and sat down and made my box straight away (wel;l after kiddie bedtime!). It comes our red in the pics but is dark pink here is a link I hope you like it, Michelle:
http://s141.photobucket.com/albums/r75/Krazy-Krafter/Exploding%20box/?action=view¤t=1164878961.pbw
Absolutely stunning. I love it. Very clear instructions.
Wonderfully simple instructions. Neat work!
Thank you Anso ... clear instructions ... will have to give this a try!!!
Thank you so much for these instructions! This will make beautiful xmas gifts! Kimber
Thank you so much for posting your class, it's great. I am going to post a link on my blog www.thescrapbookhouse.wordpress.com so our girls can see what a great job you have done. Love the 'by country' tally. Lets see if we can bump up those Aussie numbers.
Tania
Wow, thanks for this!! I've never made anything like this and yet the instructions were so clear and simple that I've got the main box and lid done this lunchtime while my toddlers napped :D Now I can have fun decorating it!
I must have a go at this one day Anso. You've posted great step-by-step photos and clear instructions. What a fab box! Thanks for taking the time to post.
What brilliant instructions! I was shown one of these at my scrapbook shop and you gave me the info to do one. My first is almost finished (need last few photos) and in my blog! Thanks so much!
I made this the other day and it was so much fun! It was for a gift and the recipient just loved it! I bought more paper to make more. I loved the "class"! Do more!!
Thank you Anso for the wonderful Class instructions. I have just completed my first box and it looks adorable. Thank you again.
I hope to see many more classes on your blog.
Petra
thanks so much... I love this...
thank you, easy to follow instructions and great photos will definately be trying this
Hi Anso, i came accross your "Exploding box" class and thought it was superb with all of the pictured detail. This will be my first attempt at scrapbooking and i am going to make one for my sister and put some of her wedding photo's in it. (what a surprise it will be for her) Happy new year to you. Thanks Teresa.
Thank you for this class Anso! I made one today. I am working on printing the pictures now :)
Love your blog!
This is absolutely adorable! I'm going to attempt making one for myself.
THANKS!!
Wow, these are great! You make it seem so simple. Thank you so much!
Thank you, Anso, for the great instructions on the exploding box. They were easy to follow and the pictures really helped. I have completed my first box and I am very pleased with the results. It was kind of you to share your instructions. Look forward to other projects, maybe? Again, thank you!
LOVE this idea, and your instructions are very clear. I am going to post a link to it on my printables4scrapbooking.com site.
Wow!! I was sent this link by a fellow crafter, theirs looked fantastic!!
Love the pics with the instructions! Make it easy to follow, will have to do one now.
XXX
Just finished a box. Thanks for the clear instructions Anso
this is so awesome! the directions&pictures are great! my 10year old gd& i made one for her mom's desk at work! i have never seen directions so clear&precise! thanks!! dale's #1 fan
My Gosh.. how I love this box :)
I made onw myself... we were like 22 girls / and one boy that went out in the country and stayed there for 4 days. And at Saturday evening we all came together in the dining room and made these boxes ;) It was so much fun :)
Here is a photo of my box, if someone cares to see..
Love from Iceland,
BarbaraHafey.
http://indland.barnaland.is/album/img/10337/20070118225627_2.jpg
and inside:
http://indland.barnaland.is/album/img//10337/20070118225615_1.jpg
Thanks so much Anso. Your directions were so easy to follow. I LOVE my newest paper craft obsession.
Hi, This is Betty from NZ iI wish to thank you for sharing you knowledge on the exploding box with us.
Blessings, Betty
Hi Anso,
I'm Alexandra from Brazil, thanks for sharing the instructions.
This exploding box are gorgeous.
Kisses
What a wonderful project, and such clear instructions!! A big TFS!!
Great Directions, Anso! May I have permission to use these directions in a scrapbooking class for 4Hers, boys and girls from ages 8 to probably 14, at our project day? We have a little over an hour and I was looking for something a little more interesting than doing a basic page layout!
thanks!
Sue K, 4H volunteer in Maryland
Hi, you have done a wonderfully clear set of instructions, so easy to follow. I am starting my box once i've posted this thank you!
x moira
wow I didnt have a clue how to make an exploding box it all seemed so complicated but these instructions make it so simple!
The photos helped alot
Super Directions! May I use them here in Washington State for my class? Love this project and how simply you have presented it (found this link on Two Peas website) Sue Sume
I have been looking for something special for my Parent's golden wedding card. This is it!!!
I will do in Golden colour tones and fill with pictures from their years together.
Wow how amazing just sat here for the last 45 mins doing stage by stage for a mothers day gift truely amazing thank you so much.
What a great project - have a vacation week coming up and I know what I'm going to be trying. Your instructions seem quite easy to follow... wil let you know how it turns out.
I love this! i tried it today and want permission to use it to teach a group of my friends I scrapbook with!
Great instructions - I made a start and then got stuck - this is excellent
Thanks so much
Lisa K
FANTASTIC! AWSOME & WONDERFUL what a delightful way to display photos to give as a gift rather than an album! Your instructions are so easy to follow. THANKYOU :)
Fantastic - my first box was gorgeous, and I'd love to be able to share your directions with my friends who want one too - may I have your permission to do so? Not all of them have internet access to be able to check out your website.
Many thanks.
Ten Thumbs T
WOW what lovely clear instructions - even I could understand and follow. Thank you so much.
Hi!
I would like to tell you that there is a woman in Israel that is claiming the “exploding box” is her invention:
www.albumart.co.il/newsletter/newsletter_10.htm
Fantastic Instructions, I tried my first exploding box from a magazine and they had printed the incorrect sizes, I got into a right mess! Luckily one of my fellow UKS friends directed to me to the correct sizes, but the magazine should have had your instructions in cos they are loads better! (I wish I had found yours first!)
Absolutely gorgeous. Can't wait to have a go at that!
Burnice x
Hi Anso - just wanted to say thanks so much for your super instructions. I had a go - and it worked first time!! Here's a link if you want to have a peek. http://scrappydo.wordpress.com/2007/04/29/exploding-box/
Thanks again.
Thankyou, this was very easy to follow and my Dad will be having his for his birthday in a few days. They really do look good, I want to make another lol.
Thank you so much for taking the time to share these instructions and take pictures! I found your link through Google and I'm so impressed! :) You ROCK! :)
This looks so cool. I can't wait to try it. Thanks for sharing it!
Oh MY Gosh. I made this box in like 5 MINUTES, whilst chatting online with friends, trying to get them to come do it too! Great instructions, GREAT photos.
You're awesome, you made this so simple. I can't wait to decorate it, alter it, and expand on it.
Thanks for sharing!
this is awesome...i'm gonna try it real soon:)
thanks for sharing Hila!! :)
Thanks so much for your class, I have wanted to make one for weeks, but all other insructions looked to difficult,yours really shows how easy it is.
I'm o go and make one now!, once again many thanks. Sharonx
I hope you don't mind but I have linked your Exploding Box Class to my forum. Thankyou so much for sharing this class with everyone. If this isn't ok just let me know and I will remove it. Thankyou
This is great and thanks for sharing .... instructions are good and clear and I cant wait t6o have a go at it ,
Jennie,(CB)
I have just finished making a box and wanted to say Thank You for your great instructions.
Thank You
sally
Thank so much for your easy but very precise instructions, mine took more considerabley more than 30 mins to make, lol but my next one wont ! lol thanks again.
Regards
Jan.... Kippax.. Leeds
Thank you so much for the very clear instructions. made one now am hooked. Sheila
hi Im just waiting for the glue to dry on my lid, thanks for the class
Anso, That was the clearest instruction sheet ever!! Thank you so much fo0r sharing. Can't wait to make one now!
TFS,
~Seahag~
WOW. Thanks for the easy instructions for making the exploding box. Had never heard of it until recently. Glad that I did. I finished the main part of the box and just need to make the top. Will be making many more.
Thanks so much. I've wanted to do one of these for ages. These instructions are gr8. Sue
Hi - I love your exploding box. I am in a group with cardmakers & scrapbookers. I'd like to use your instructions to teach themhow to make these. Is this O.K.?
Thanks,
Bobbiecz
mamacz@sbcglobal.net
cutychrissy said
thanks very much brilliant instructions. so clear and easy to do. made one for my daughters 18th and everyone thought it was brill thanks
Hi I've just found this and you have made my night......I'm so going to make one of these!thankyou,
just made some cookies which you will love (green shoes!) they are on my blog Tx
Thank you for simple, straight-to-the-point instructions. I will definitely be giving it a go.
Thank you so much for sharing these instructions! I have been looking all over to learn how to make one of these boxes. I've seen a couple of sites with instructions but they looked so daunting using chipboard, etc. Your instructions are so clear and concise I can't wait to give a try. Thank you!
Hi Anso
Thanks so much for sharing these instructions, I did a search, and all the links kept coming back to you! The instructions are so clear, and the photos show exactly what to do.... which is why I'm asking your permission to use them. I am helping organise a crop in a couple of weekends for ScrapPink, and thought this would be a fantastic project for the ladies to do. If you were to give me permission, I would certainly put your name/website on the instructions. Thanks alot.
your instructions are great thanks
Hi there! really appreciate your instructions and thanks for making it so easy to understand! can't wait toget started on my new project! you're a GEM!
I just tried your exploding box and your directions were so clear - the pictures helped also. I had other directions but never tried them because they were confusing. Thanks so much!
Thanks for the instructions and examples!! Super easy to make, and oh so cute!
Thanks so much !Brilliant instructions !!
Thanks for such clear instructions. I've always wanted to make one of these - I'm off to do some cutting, scoring & glueing!
Love Gill (aka Gillybee)
Wow! That's perfect!
Thanks a lot!
Following your excellent directions, I made a box yesterday and I am very pleased with it. I'm now waiting on my pictures to be printed to see how they fit in the box. Thanks for having the free on-line classes!
This is super cool! Wonder who in my life needs an exploding box album for Christmas. Maybe my step-MIL, who loves to scrap, would appreciate one!
What a brilliant idea - thank you for the opportunity to take a free class - it is now doing the rounds in Australia
this is awesome...thanks for sharing the photos and directions
Thank you for sharing your exploding box. You make it look so easy I'm off now to try to make one, wish me luck......
I'll try it today.
I have a 3 year old niece and I will give it to her as a present, full of photos.
Thanks!
Happy new year!
Thank you for sharing this idea and the instructions!!! I will be making this for several special people.
Beth
THANKYOU I'VE JUST MADE MY EXPLODING BOX, THANKS TO YOUR INTRUCTIONS ON CHARMED CARDS SITE.
IT IS SO CLEAR,I'VE ALWAYS WANTED TO MAKE ONE AFTER ADMIRING OTHERS! thankyou, i shall work my way through your classes too!!
Thanks SO MUCH!!! I've been wanting to make one of these for a long time. :)
This is brilliant! I've always admired these boxes, but wouldn't have had the first idea how to go about making one. Your instructions were so clear and your examples so great that I would feel confident giving it a go and that it would be successful! Thank you for your instructions!!!
This is fantastic! May I use a couple of the photos of yours for a small class here on Yokosuka Naval Base? I have my own directions typed up, but could use a couple of your great images!
LiiiiiiiiiiiiiiiiiNdaaaa****
AgoRa sim vou poder fazEr!!
Obrigada pela instrução!!
;*
Hi, I have followed your instructions several times and just LOVED the end result...would you please let me use your instructions for a group class?
Hi Anso,
Thanks for the great, clear instructions!! I made my own box last year for my best friends b-day - please see the links below for photos - i hope you like it.
http://www.docrafts.co.uk/gallery/?pg=l&gid=233286&pageNo=1
http://www.docrafts.co.uk/gallery/?pg=l&gid=233289&pageNo=1
http://www.docrafts.co.uk/gallery/?pg=l&gid=233285&pageNo=1
I have recommended your website to my Swiss friend who wants instructions to make her own!
Leahanne
Anso,
Thank you for sharing the instructions. I made a box with different instructions, well it didn't come out as well as I thought it should. I just did one with your instructions and --- WOW!! It was so much easier. I was wondering if it would be possible for me to share these instructions in group class?
Mahaho (Thank You)
Gina
I don't have any 12 x 12 sheets of card all mine is A4, but I will have tomorrow!!
Liz
I found instructions for a similar box on another website, but they were quite confusing. Yours are simply and the pictures really help. Tried it myself and the box turned out wonderfully.
May I have your permission to use your instructions for a class I have coming up here in BC Canada?
Many thanks
Kathy
Thankyou so much for your super- clear instructions. I've now made my first box, but it won't be my last!
Thank you for your instructions!!!
Can I use them in a craft group that I am teaching? I would really appreciate it.
Thank you so so much for your brilliant photos and step-by-step instructions!!
Have been looking everywhere for exploding boxes only to find they have all sold out...now I can make templates and make them myself instead of waiting!
I hope to be able to make excellent boxes just like yours ^^ x
WOW! This is great. I'm going to have to try this sometime. =)
Come visit me -
http://leasanders.wordpress.com
Thank you so much for clear instructions. I've got everything ready to have a go, can't wait!!
I'm late to the game Anso - (beautiful name)..but I am always needing to take my kids at he Boys & Girls Club a "notch" higher if you will and get them to try something different. I will give you ALL the credit as my expertise lies in paper, scissors and glue ...not ideas. 'THANKS' for your genius and step-by-step or I;d be L-O-S-T!
Thank you so much I love scrappin' and I just saw an exploding box on someone's blog...googled it and voila'! Here was you blog with the nifty tutorial...thanks a bunch.
Thanks so much for a wonderful gift idea, You are such a gem!....I have made one for my MIL for Mother's Day.
Check it out at scrapbookingmemories.com.au
search for my username Ohl68
Thanks for such a comprehensive guide to the daunting exploding box! I've just made one for my FIL's 70th birthday
Stunning - instructions were absolutely crystal clear - I made my first ever box in about 20 minutes today, just have to decorate it now. You have a real talent for explaining!
Thanks a lot
Oh, wow! Thank you so much for posting this..I want to try one, and now I have the knowledge to do so! Your box is gorgeous!!
Kim
HI, love the instructions! We are in the midst of opening a store (this coming friday!!) and I wanted to ask If I could use your instructions for one of our first classes coming up. Please let me know, thanks!
Lisa
ilisau@hotmail.com
Scrappers Depot
Design Team
Thanks a lot for the great instructions and nice photos, I´m definetely trying this soon!
I would love to teach this project to our group of Home Bureau ladies and will need permission to use your great instructions. Home Bureau is a New York State organization that does community service projects, crafts etc. We meet once a year and teach craft projects. If possible could you email me permission to use your instructions.
My email is cmsherman40@hotmail.com
Thanks
Carol
Wow! A friend of mine referred me to this project and I think it's great! I can't wait to work on it! Thanks for the great idea ;)
I was referred to this site for this project and the instructions were very simple to follow. I would like to make a larger one...would it be possible to start with a 12X12 piece of paper and work my way down that way? Would you be willing to help me figure out the dimensions that would be needed? Thanks!
I made this box for my husband for fathers day and he was so impressed. Many thanks for your clear instructions. It was so easy to make, And alot of fun, too!
Hi Anso,
Thank you for your clear instructions, they are great. I made these boxes recently for friends & have now been asked by one to show the ladies at her flower club how to make them. I will not be getting paid for this. Would it be ok to print off your instructions & use/give them to the ladies please? I will of course credit them to you & direct the ladies to your blog site.
Thanks,
lillibean
Hi Great exploding box. I have made a couple a while ago will have to make another one soon. Great colours.
I love your box and the instructions are clear and easy to follow.
I would like to share this with others. I'd love your permission to teach a class using your pictures, if you don't mind.
I don't see an e-mail link on your blog.
Fantastic clear instructions thank you so much. I have been wanting to make one of these for so long but was worried about 'the how to' Now it all seems clear.
Very Very clear instructions, thank you so much. it took me probably an hour to make it and i absolutely love it! If i can do it then anyone can. thanks again
Hi, I am putting together a craft night for some women in my church and your directions for the explosion box are the simplest and easiest to understand. Would you mind if I used them? Each women has to sign up if she wants to make one...there will be many projects to choose from so I am not sure how many will make it. With the directions I could put the link to your blog if you would like. Just let me know if you would be okay with this or not. My email is nervous_nancy@hotmail.com Thanks - Nancy!
Such clear instructions, many thanks I have linked this through my blog as I get asked many times at work how to make these boxes.
Happy Crafting
Lisa
Many thanks for your brilliant clear instructions. I've just finished my first box - an 18th birthday present for one of my nieces - and I'm thrilled with the result. I hope she'll enjoy looking at it for many years to come.
Kind regards
Jane
We love the explosion box, maze book and man card. could we have permission to share the instructions in a class. we are the only scrapbooking store in our town! Of course, you would full credit for the directions and photos.
Thanks
Debbie
Scrapper's Depot
What a fantastic tutorial! Thanks so much for taking the time to include the photos and such clear instructions!!
:) Mags
magsgraphics.blogspot.com
Absolutely delighted with your tutorials, I shall be coming back for more, after I have tried to make this exploding box. Your work is excellent and of great value to me as a learner. Thank you very much for these inspiring tutorials.
your tutorial is fantastic, thanks for sharing, i want to make this box, i'm very happy to find your blog.
thank you/gracias
Thanks for such clear instructions. With pics even! Thanks so much!
You are so talented. You have very clear and concise directions, very easy to understand.
Thank you for these instructions! I have a template that didn't come with instructions and I had no idea what to do next. I'll be busy tomorrow thanks to you!!
Hello there Anso!!
I'd like to use this pattern for a church class. Once every 3 months we get together and make crafts and do service projects. This is just so nifty! It would just be aces if you'd allow us to use your pattern! You said we could use it with permission. Anso May we please use it?
--Thanks and hope to hear from you soon!
Aja
Hello there Anso!!
I'd like to use this pattern for a church class. Once every 3 months we get together and make crafts and do service projects. This is just so nifty! It would just be aces if you'd allow us to use your pattern! You said we could use it with permission. Anso May we please use it?
--Thanks and hope to hear from you soon!
Aj
thanks so much for the great instructions i use your class to amke a cute box for one of my sons classmates birthdays. i posted photos on my blog.
www.tweetybugshouse.blogspot.com
Thank you for such nice instructions. You are a very good teacher.
Thank you so much for the great class...I am making 21 of these for my Girl Scouts about their exploding year!
I'd like to put a link to your instructions on my blog, if you'll allow it. I found your instructions to be very easy to follow, thanks so much!
Thank you! I took the class and you can see the results here: http://lehtipollo.vuodatus.net/blog/1751933
You've done such a fabulous job of explaining ~ and beautiful job of showing how to make those boxes! I would love to show friends coming over how to create them, if that would be OK?
Thank you so much for sharing!
Susan
This is a great glass! You make it seem super easy, and thank you so much for giving the measurement for the photos, I always have a hard time deciding what size to use! I'm going to make this to serve as a mini album for my sons first birthday...you know since it looks like a little present! I can't wait to get started!
Thank you,
For posting you classes. How would on go about getting permission you use any of your classes.
Thank you.
Hi anso,just wondering if I could use this in church and at church girls camp. I haven't done it yet but it looks so cute.
cheryl
I am not a scrapbooker but I have several friends who are and I knew they would love your instructions so I passed on a link to your site.
I LOVE these instructions. They are the best I have found! Thanks so much for posting them. How do I go about getting permission to use them for a faithbooking retreat for our church?
Thanks,
Teri
wow, this is amazing!! I seen a quick blurp about this box on tv but never got the instructions to make it. I am so happy you posted this class and have very well written instructions and pictures. Thanks so much for sharing =)
Wow, this looks like something I could attempt. Thanks for the instructions and the pictures help so much too. THANK YOU!
Thank You for doing these clear instructions! It really helped! Thanks for giving your time and effort to these!
What a wonderful project! I came across your page this afternoon and have made one box already. TYTYTY for having such clear instructions and lovely pictures to go with. I can't wait to make more!!
WOW! That is most awesome; like totally!!
My friend and I were looking for a cute but easy idea for our end of the year gifts for our kid's teacher gifts when we came apon your exploding picture box's. They were so easy to make. The teachers just loved them. Thanks.
This is really cool. Thanks so much for these instructions. I'm a new grandmother and a new scrapbooker! Did you use the Cricut to cut the shapes? If so, which cartridge did you use. Seems like it would make it easier to get the exact measurements.
What did you use to make the corners round?
Thanks, CaryM
Thank you for the class, Anso. I love it. May I have permission to use your class to teach this to some ladies at church?
Thanks so much Anso! I've seen several different sets of instructions for these boxes, but yours is the first clear one! Thanks for sharing.
Thank you so much for your simple instructions. I would like your permission to use some of your pictures. I have worked up instructions for a paket that the young women in my chyrch can make at girls' camp. I have done most of the cutting myself but would love to be able to use some of your pictures.
thanks
cheryl
Great!!! Best instructions I have found on the web for an explosion box! I love your finished product too - awesome!
good evening,
I am a public school art teacher and was wondering if I could use your instructions and/or pictures on my class web page for my 9th grade students. I teach 3-D art and I think this would make a great assignment for them to use. I would, of course, reference your web page on the class website.
I appreciate your time, please feel free to contact me.
Zoraida
Awesome tutorial! Thanks for putting it together!
Thank you Anso, for such clear & easy directions. I shall make some for family birthdays etc.
Thank you! Great tutorial!
I love your site! I've made these for my son's grandparents and they love them! You are so talented. A group of ladies at my church want to learn how to make these (for personal use). May I have your permission to show them your instructions, with full recognition going to you? I would also help them make their own boxes and I wouldn't get paid. Thanks for all your hard work!
Wow what an awesome tutorial. Thanks so much for posting the step-b-step instructions.
Carmen L
I don't know if you ever look at the comments on this since you posted it in 2006 :-) I wanted to post anyway and tell you how much I appreciate the detailed instructions that you gave. I love this project and I hope my family will love their Christmas gifts just as much!
Thanks so much for the great step-by-step instructions. They were so easy to follow.
I just finished making my first box, and it came out great!!!
Great :D Thank you very much!!
Hello Anso, i have written a post about exploding boxes and linked your instructions too, i found the instructions very clear and precise thanks for sharing,
hugs
Crafteresa x
OMG this is great!! love the colors used to. Who would have even thought a a picture each month worked. Great idea!!
Thank you! I would like to use this lesson for a scrapbook weekend I am hosting. I would fully credit you as the source... do you mind?
Pls email me if this is a problem.
Thanks again! I'm off to make my box now.
Thank you Anso ...Have just finished my exploding box for my partners birthday ...looks really good instructions were so easy ..thanks again ..Susan
What a great idea! Very nice.
I have yet to make one of these...thanks so much for the great directions and photos...I think I can do this!
Thank you for this tutorial !
I have just made a box for my sister will post it on my blog soon!
Super tutorial
xxx
Just found this! Very detailed directions/photos. So very helpful. Thank you for this class!! Can't wait to make an exploding box.
Really an amazing and Fantastic Box, thanks for sharing it with all of us. I`m going to make one, and I`m glad that I have some "recepie" that tells me howe to make it.
Thanks
hi, just letting you know that I have linked your blog for the explosion box from my website www.mmtscrapbookinganddesigns.com
great instructions !!
thanks loved your instructions have made a link from my website's blog to your explosion box link.
thanks
www.mmtscrapbookinganddesigns.com
Thank you for sharing, I hope to try and make one soon.
i actually wanted to know how to make hexagonal explosion box.. if yo could help me out please
I've seen this before on the web. I am going to make my boyfriend one for Christmas. And I'm now following you :)
Simply wonderful!
Thank you for excellent instructions. elaine.
thank you so much!
used your idea for my wedding proposal. it worked! ;)
process here -> http://julianflora.ezfhosting.com/?p=62
Hello, thanks a lot for your great instructions.
I made a box for my daughter. It is a "think pink" - box.
http://stempeltuermchen.blogspot.com/
Kind regards
Petra
Wow, this is an amazing tutorial, I can't wait to try this out. Thanks so much for sharing! ~Jen @ www.icantstopcrafting.blogspot.com
This is precisely what I was looking for!!!! Some people's idea of an explosion box is NOT this! Thank you for the awesome instructions!!!
Thank you for the fantastic and detailed instructions! I have a baby shower coming up next week (for one of my crafty friends) and I think this will be a perfect gift for her.
Can you tell me what the little month stickers/stamps are? They are really cute and I would love to find some for my box. Thanks for the great inspiration!!
is very beautiful!
thanks for sharing!
visit my blog:
http://lluviadecreaciones.blogspot.com
I am so inspired and you explain each step so carefully. I am planning to make some for the parents of the children in my care and would be pleased if they come out just 1/10 as beautiful as yours! Thank you x
Hello Anso! I soooo enjoyed making this box as gifts last year for Christmas! It was a huge hit!! I just started my own website last month, and was wondering if I could use your instrustions and photos on my website. Please let me know ASAP I would love for my readers to have the chance to make some boxes for their own gifts for christmas this year! Thank you !
Hi Anso...got your email sorry I forgot to give you my email...it's viv.matthews4@gmail.com Thanks again for getting back to me.
Great idea, but does anyone know how to print photos smaller than standard 6 by 4? I don't have a home photo printer and none of the shops here do them smaller so all my pics are too big to fit in the box I just spent ages making! :( Any help appreciated! Thanks Xx
Post a Comment