
Please feel free to use these instructions to make your own boxes. You are free to link to this page from any forum etc if you wish. Please do NOT copy this information and/or photos to use for your own classes/forums/webpages without permission. Please also note that I'm not claiming that I have invented the exploding box, but these simple step-by-step instructions and photos are mine.
Class Supply list:
For the box you will need:
* 3x 12x12 sheets of cardstock
For the lid you will need:
* 1x 12x12 sheet of cardstock (though this can be A4 also, you only need a 6 ¼”x6 ¼” piece)
Tools:
* trimmer
* scissors
* scoring tool, like a bone folder etc, or the scoring blade if you have a Zision trimmer or similar
* glue (I would recommend double-sided tape PLUS a wet glue like Glossy Accents, Diamond Glaze etc)
* 4 paperclips (to hold card in place while drying) – optional
* corner rounder – optional
* inkpad for edges of card - optional
I would recommend that your four sheets are either exactly the same colour, or different shades of the same colour. Of course, if you want more of a rainbow effect (!) you could use four sheets of totally different colours. I have used two different shades of green Bazzill. The class with mainly focus on how to make the exploding box itself. However I will also supply some photos of my finished box.
If you wish to continue after the class and decorate your box you will need: about 5-6 sheets of co-ordinating patterned paper (assuming you want to cover the “pages”) up to 26 small photos (assuming: one on each “flap”(front and back), one in the middle of the box and one on the top of the lid) ribbon to go around the lid (optional) any other embellishments etc that you want to use. The class is called “An Exploding Year” because my box will feature “random” photos from the past year…so it’s kind of like a summary of a “year in a box”.
First of all – please don’t be put off by how long the instructions are. It’s only because I have made them VERY simple and step-by-step with lots of pictures. Making the box and lid (not decorated) only took me 30 minutes. And then I had to stop all the time to take photos of the different stages.
Normally I work in metric, but for making this box it’s actually easier to make it using inches…so that’s what we’ll do. Ready?
1. First we’ll do the box itself. Take your three sheets of cardstock and cut them as follows:
• one sheet to 9 x 9 inches
• one sheet to 8 5/8 x 8 5/8 inches
• one sheet to 8 ¼ x 8 ¼ inches
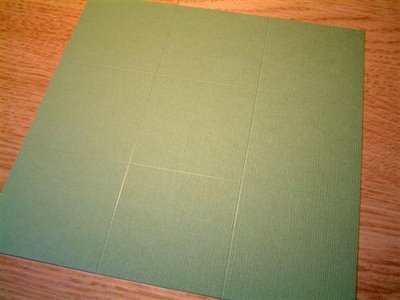
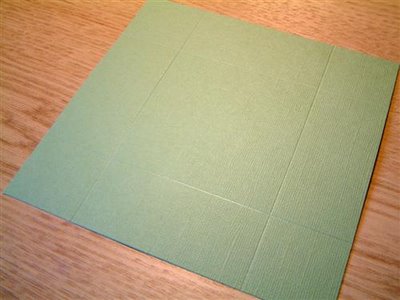
 2. Now score each sheet according to the measurements below. You score on all four sides (see photo below).
• score the 9 x 9 sheet, 3 inches in from each side
• score the 8 5/8 x 8 5/8 sheet, 2 7/8 inches in from each side
• score the 8 ¼ x 8 ¼ sheet, 2 ¾ inches in from each side
 3. Following your scored lines, cut off all four corners on all three pieces.
 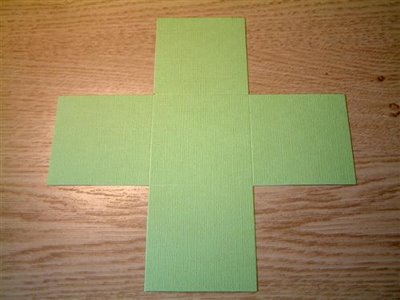 4. At this point (and this is optional) you might want to ink the edges (don’t forget to do both sides!) and/or round the corners.
 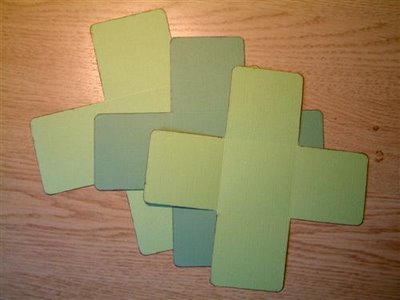 5. Now you need to glue together your pieces. It’s easiest if you start by putting the smallest piece on to the middle piece and then the medium (+smallest) piece onto the largest one. I would suggest you use double-sided tape for this. You ONLY put your tape/glue on the MIDDLE square. Like this:
 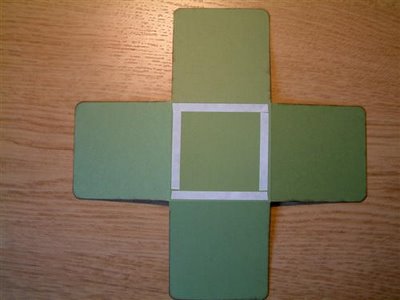 …and don’t forget you do NOT need glue on the back of your largest piece. Once you have put them together, you should end up with something looking like this:
 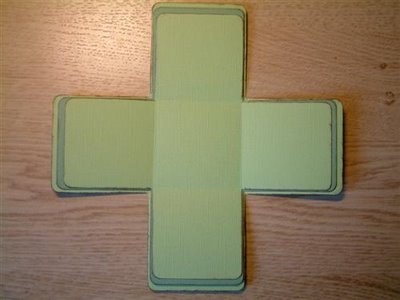 6. Fold up the edges of your scored lines.
 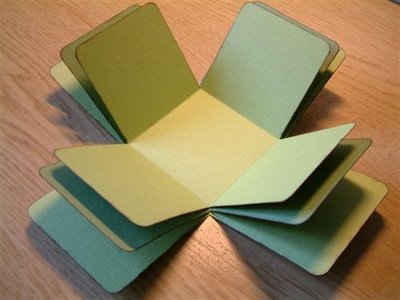 7. Now you can put the box to one side. It’s finished for you to continue decorating now or later. Onto the box lid:
8. Take your piece of cardstock for the lid and cut it to: 6 ¼ x 6 ¼ inches
9. Now score the lid, 1 ½ inch in from each of the four edges.
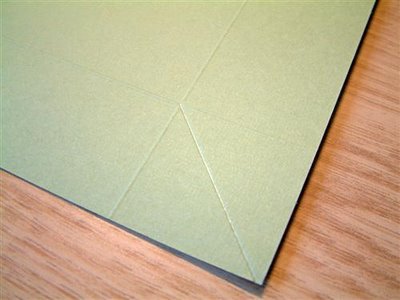
 10. Right, this might be a bit tricky to explain in words, but the photo below should help you. TURN YOUR CARD OVER and you need to score from the tip of each corner, diagonally, until you meet your scored “corner” lines. See photos:
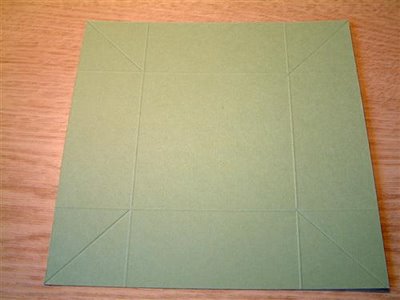
 11. Fold all your scorelines and pinch the corners and fold them inwards. See photo:
 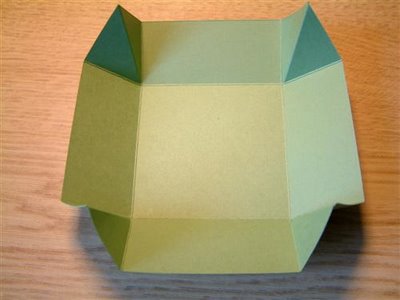 12. Glue the corners in place. I found that double-sided tape was NOT strong enough for this (it holds for a little while and then lets go) so I would recommend a wet glue, something like Glossy Accents or Diamond Glaze for this. You can either hold the corners for a little minute until the glue is dry enough to hold the corners in place, or you can use some paperclips to hold the corners in place while drying.
 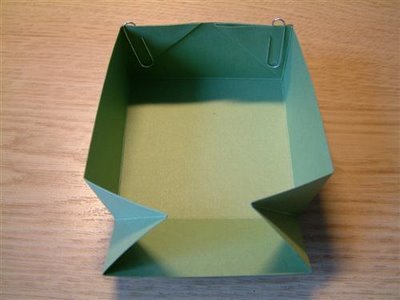 ...your lid should now be finished and look like this:
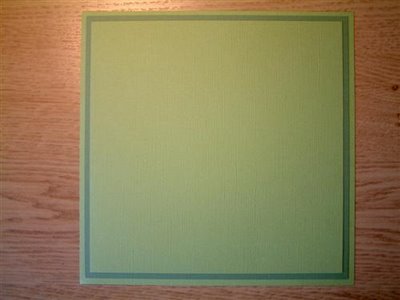
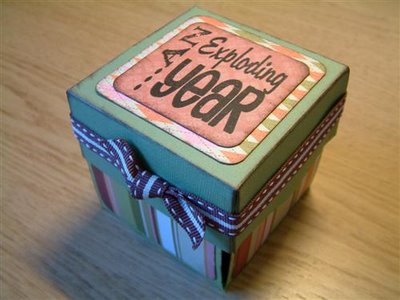
 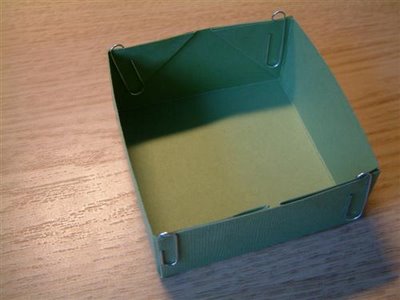 And your finished complete box should look something like this:
 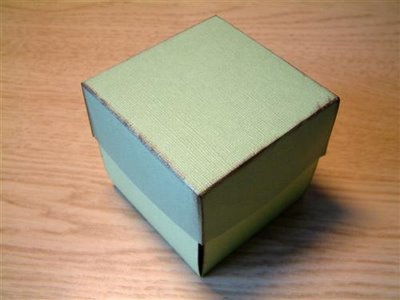 If you want to continue decorating your box, I would recommend the following measures for your paper (I’m swapping to metric now since it’s easier to be more exact):
• one 7,5x7,5 centimetre square for the top of the lid
• one 6,5x6,5 centimetre square for the centre inside your box
• eight 7x7cm squares for your largest “pages”
• eight 6,7x6,7cm squares for your medium “pages”
• eight 6,5x6,5 cm squares for your smallest “pages”
Round your corners and/or chalk your edges if wanted.
I have used Chatterbox papers for mine and this is what my box looks like decorated:
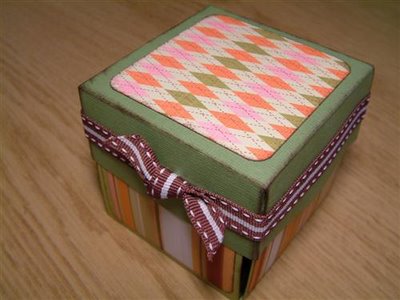
 I have used small photos in mine. I used 20 photos in my box. One on each page (not on the lid, centre square, or the four sides that makes up the outside of the box) and I printed my photos: 8 photos to a 15x10cm photo (6x4 inches). Very easy if you have an Epson PictureMate. Each little photo measures: 5x4 cm.
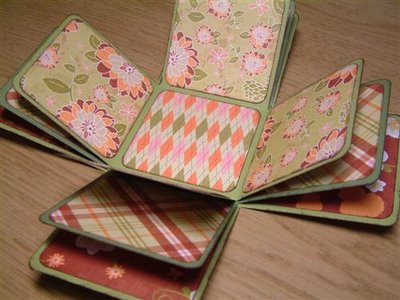
And here is my finished box:
 I hope you have enjoyed my class and thank you so much for taking it!
Anso


310 comments:
«Oldest ‹Older 201 – 310 of 310Thank you Anso for this fabulous tutorial! Great instructions and pictures! Happy Holidays!
Thanks so much for the easy instructions. My teenage daughter thought this was a great idea to make for a friend. Jeneice
Just a small question
if I made these explosion box can I sell them to include in sellling my crafts?
can you reply this question please
thank you
beatrice
Gracias, está excelente este pap, ya hice la cajita, gracias a ti.
Bendiciones desde Chile
thank you so much for sharing your instructions for this cute little box. Wonderful gift idea for any occassion. I shared my results on my blog www.inspirationsandimagination.blogspot.com Thank you!
Thank you so much for sharing this great idea, I can't wait to make one for my new daughter in law, Thinking of putting some Wedding photos in it. Thanks again
Hi Anso! Love love love this box! May I have permission to use this for a class of my own!! All credit goes to you of course!!! I'll point them all to your blog!!! Thanks!
lindseyheilman@yahoo.com
Thank you so much for your amazing directions!! I have tried many crafts that I found on blogs and your directions are the best! I can't wait to try making a box for each girl in my bridal party! Thanks!!!
I love this! I highlighted your craft on my blog today. Thank you so much. http://scrapbookalphabet.blogspot.com/2012/07/tuesdays-guest-freebies_10.html
Wow... I just saw this on Pinterest and want to tell you THANKS. I own a personalized photo jigsaw puzzle business and am also a teacher. I will definitely put your ideas to work in my classroom with the materials I use from my puzzle business. Incredible...Thanks again!
Thank you so much for the tutorial! I made one for my husband and it was a huge success! I turned it into a card and it will be featured on the website thedatingdivas.com
I made sure to link your site! Thanks for the inspiration!
I made one as a gift for my best friend. Thanks so much!! http://pinterest.com/pin/196751077441479226/
I have been making these boxes for about eight years now. I love them. I make one each year from photos of my granddaughter. When she is an adult i plan to give them all to her!!
Would you be able to let me know what stamp set you used for this?
I ran across this on Pinterest and so glad because I want to try this. I have never done anything like this before so am excited to try it. Thanks so much for sharing. :)
thank you!!! :)))
I am a High School Teacher and would love to teach this to my class. Do I have your permission. I would totally give you credit for your great idea and refer them to your blog. Let me know. Thank You!
Adorei esta caixa. Vou tentar fazê-la. Parabéns. Maria Rita, Porto Alegre, RS, Brasil
How long do these usually take to make?
Thanks for this, Ive been struggling all morning, but found your tutorial and found it easy to do. I have completed my box, just need to decorate. Many thanks x
Such well written instructions and pictures are great too. Thank you for sharing.
So cute! Can't wait to make one! Thanks for the tutorial!
So neat! I made one of these using the mini albums cartridge for my cricut, very similar and super easy.
I absolutely love this and the directions are very easy to understand. Thank you!
Brill idea. Very good instructions. Thanks for sharing!
Hello Anso, - such wonderfully clear and simple instructions. I made one a long tme ago and it seemed ever so difficult to follow those instructions. With yours, I can't wait to get started - I feel exploding boxes for Christmas coming on! Blow the housework. Thanks for sharing
Georgina35
Great project! I teach high school photography. Your directions and photographs are very clear. Could I share your site and directions with my students?
What a fabulous project! Would love to offer it at my December Stampers Club thus I am asking permission to do so :)
Really great instructions! They obviously stand the test of.time:-)
Sonja from Amsterdam, The Netherlands
This is such an awesome idea!! i love it. thank you for the great directions, awesome job!
I made this, great instructions so simple yet creative!
I was wondering how you would feel about people making this themselves and selling it on something like etsy?
Nice! So creative! This can be an excellent Christmas gift. ;)
Nice! So creative! This can be an excellent Christmas gift. ;)
I love it! Thank you!
SOMEONE PLEASE HELP! WHAT DO USE FOR THE BOX? LIKE WHAT IS CARD STOCK? AM I SUPPOSED TO USE LIKE CARDBOARD OR THE COLORED SCRAPBOOK PAPER THAT IS THICKER???????? THIS IS URGENT AND I AM VERY CONFUSEDD!!!!!!!!!!
hi this box is awesome! where do you get cardstock? is it very expensive?
nice one thank you......
Hi, great instructions! What did you use or create for the month and date that is pictured on your pages?
this is awesome! I love the idea of having it be about the year :)
Love your blog!!
kianabates.blogspot.com
I saw an episode of American Pickers where they found an Antique exploding picture boxes on one of their picks. I looked it up online and when I found your instructions, which are very well written, I decided I am going to give it a try. Thanks so much!
Love the box and your ideas. Thank you so much for your perfect instructions.
Great Idea - I can't wait to make this! Thanks for the clear instructions.
This is one of the cutest ideas I've ever seen. Due to my spontaneity, I ended up making it with poster board and colored paper, but it still turned out decent. Next time, I'll be sure to use card stock! I'm giving this to my boyfriend for our first anniversary, and I have it decorated with lyrics from All My Loving by The Beatles because he sings me that song sometimes. Thank you for this lovely idea!
I just completed my first "Exploding Box" and it turned out wonderful. I truly appreciate how easy it was to follow your instructions from start to finish. Thank you!
I just completed my first "Exploding Box" and it turned out wonderful. I truly appreciate how easy it was to follow your instructions from start to finish. Thank you!
What a great idea! Thank you for wharing this whith us.
Hi Anso,
Iam teaching bookmaking and paper crafts at a store in Illlinois. I was wondering if I could have your permission to teach this class? Please let me know how to proceed
Thanks,
Linda Doyle
Mundelein, IL
A very interesting read! If you don't mind I will put up a link in my blog.
http://ferscrap.blogspot.com.es/2013/05/capsa-explosiva-dels-55.html
Thank you!
Hi there,
I just created one of these boxes and it is as cute as can be, but very very small. I wanted to out pictures but even wallet size photos are too big. Does anyone have any ideas or has anyone created one that is bigger? I want to do this for my dad for Father's Day and just thought someone else may have experienced the same thing.
Thank you!
the photos need to be 2x2 inorder to use them in the box. I havea program that allows me to print out a whole sheet of 2x2 photos and it works perfectly.
ntTInc
Bonjour, Je souhaiterais mettre ton tuto : du 28 novembre, 2006,
"Eclatement de la boîte" Class ...sur mon blog en France, les photos et tes explications, n'ayant pas trouver où l'on peut te contacter, je passe par les commentaires. J'attends ta réponse. Bonne journée
Thank you! for the clear instruction. You made it so easy to follow. And this is an awesome craft project. I'm doing this for my husband and one for my mother-in-law. Cheers Anso! Have a good day.
Thank you but can you post a vedio also I would love to see a vedio thanks for instructions I will try them I am not good in crafts
Hi,
Can I use some other material for the box. I am facing real problem searching for card stock paper here !
Thanks
I was just curious, if I wanted to make a bigger version of this, would I just add equal measurements to everything, like 1" or 2"?
I am not very creative, sorry...only when someone else does the leg work like you did...so thank you this is awesome.
seriusly cutest idea ever!! Thanks for sharing!
xox showeredwithdesign.blogspot.com
This is AWESOME! I am really excited to try making one of these boxes. Thanks! You have a great eye for colors and patterns too...
Is there a printable for the top of the box an exploding year?
Or can someone email me how to make the top of the box printable/saying? amandakswan@gmail.com.....Thank you :)
where would you recommend purchasing the cardstock?
Oh my goodness! I just made one of these and I love it!!!!! So excited to give it to the grandparents at Christmas! Thank you!!!!
I would like to do this for my grandson's first birthday, with one picture for every week of his first year. Any advise for enlarging this 3 more pages so I can have 52 surfaces instead of 26? Thanks, Beth
Hey Anso!
I just made the box using your simple and clear instructions! Thank you so much... so creative. I was wondering how do you "chalk" the edges of the box? I was picturing using chalk but would that smear if touched? Thank you for your help! My email is nvuong23@gmail.com.
thank you!
Nancy
This idea is really cute! Does anyone know where I can find 12x12 cardstock? I can only find 8.5x11 at Walmart.
Thank you so much for these easy instructions! I made one of these little boxes for my boyfriend for our 2 year anniversary and I'm sure he's going to love it! It was so easy to follow along with an do.
Hi anso. Thanks for this. I'm creating one for my bf. <3
I love this idea and am making my box now... it seems mine is a lot smaller than the one you posted. I have also clicked on the links other users have posted with pictures of their own boxes. Directions are easy, but I feel I am doing something wrong with the size. Please advise.
Avir914@yahoo.com
Thank YOU!
Informative article, precisely what I wanted.Lend A Box LLC
Thank you so much for your easy directions... I made my first card box today!! Was so much easier to make them with your clear instructions --- Stephanie
LOVE the box instructions thank you... wanted you to know that I loved them so much I shared your blog link to this page to my cards page on my blog: http://stephnapp.weebly.com/my-cards.html
Thanks! Made one for my Mum, with all the reasons why I love her written on the inside!
Thanks! Made one for my Mum, with all the reasons why I love her written on the inside!
What a fantastic tutorial. I'll be following your instructions to make my first exploding box.
Thanks Anso! I made this for my girlfriend and she absolutely loved it! I printed little square photo cards from Printstagram.com and they were the perfect dimensions for your box.
For each side, I printed out and stuck screenshots of our whatsapp conversations. On top of that I taped the top of a photo of us. So when she flips up each picture, there is something that reminds us of what we have said to each other. I did that for all 24 sides.
I thought it added a nice surprise :D
Thanks again!
Great Idea !! I found this on pinterest I am going to make one for my partner for our anniversary
http://everyonewantstosmile.blogspot.com
Thank you so much for the excellent, easy-to-follow instructions. I only had one little hiccup in the whole process. Thank you for taking the time to write out all the details AND include pictures!
What size do the pictures need to be?
This is so awesome! I'm now making one for my boyfriend and it's coming along great.
How did you write the "an exploding year" though? With stencils or free hand?
Thanks :)
Such an awesome gift idea...Love it!Cant wait to finish making :)
Thankyou so much for sharing your tutorial!! It made making the box very easy! It turned out great!
Thank you! Great tutorial and imagination! :D
THANK YOU VERY MUCH for this wonderful idea :)))
Is there anyway to make the size of the box bigger. Would you be able to help me with the demensions. Please get back to me thank you!, I'd greatly appreciate it
Thanks it's very beautiful and funny
Loved this idea! thank you from Colombia!! :)
Is there a way to make this box a little bigger? Do you know what those measurements would be for the lid and box?
Did you ever find a way to make a bigger box? I'd love to know how you did it, if so
I loved your class! Thank you so much for this, and i really liked the fact that you made step by step, thank you!
Thank you Anso for this amazing tutorial. My box came out fantastic!!!!!Its for our daughters birthday. She has Breast Cancer and we are blessed she is still with us.
Vanessa C.
Thank you Anso for this amazing tutorial. My box came out fantastic!!!!!Its for our daughters birthday. She has Breast Cancer and we are blessed she is still with us.
Vanessa C.
It amazing and interesting, thanks for sharing.I want to making it but I don't know how to make this.Now I can do it.Thank you so much
Thank you so so much. Absolutely fantastic. Made 1 for a friend, the joy ws priceless when it was opened. Thank you
Lovely Gifts really appreciated I must try this and should post in my store thanks for sharing such a useful post.
Wow thank you so much
Hi I am wanting so much to complete one of these....but would like to know if you have the instructions on how the ink the corners or round the edges of the paper.....and one more thing the double sided tape that you used how wide is that.
Very well said :) Thank you.
Very easy to follow instructions! Although I got photos printed to the sizes that were mentioned and they are far too big.
Best. Instructions. Ever.
You are the BEST ... looking forward to more of your projects!
nice blog very interesting one, thanks for sharing this information, it was more helpful for us Custom packaging boxes India
We offer custom boxes that give you full liberty of customizing the entire packaging at every step. Packaging is the first thing a customer notices. It has to be spot on to appeal to the customers
custom Packaging Boxes india
Notably, we make long-lasting boxes for our customers. The box has to be as firm as possible. The safety of the product depends on the box. Therefore, we focus on using the sturdiest packaging for linked custom jewelry display boxes. Indeed, jewelry lovers get attracted to visible jewelry boxes
dayum the comments from 2006
Thank you for such clear directions. I made 3 of these as christmas gifts. I put various tea bags inside with chocolate candy in the middle space.
Post a Comment