
.jpg) Please feel free to use these instructions to make your own cards. You are free to link to this page from any forum etc if you wish. Please do NOT copy this information and/or photos to use for your own classes/forums/webpages without permission. Please also note that I'm not claiming that I have invented the design,I have seem similar cards in the past, but these simple step-by-step instructions and photos are mine.
Please feel free to use these instructions to make your own cards. You are free to link to this page from any forum etc if you wish. Please do NOT copy this information and/or photos to use for your own classes/forums/webpages without permission. Please also note that I'm not claiming that I have invented the design,I have seem similar cards in the past, but these simple step-by-step instructions and photos are mine.Class Supply list:
One sheet of white card (you need 21x15 cm)
One sheet of black card
Small piece if patterned paper for tie & pocket (use your scraps!)
Ruler
Paper trimmer (and scoring blade)
Scissors
Pencil
Double-sided tape, or other glue of your choice
Matching chalk ink (optional)
One 3D glue dot (optional)
1. Cut your white card to 21x15 cm.
One sheet of black card
Small piece if patterned paper for tie & pocket (use your scraps!)
Ruler
Paper trimmer (and scoring blade)
Scissors
Pencil
Double-sided tape, or other glue of your choice
Matching chalk ink (optional)
One 3D glue dot (optional)
1. Cut your white card to 21x15 cm.
.JPG) 2. Score the card down the middle (measure 10,5cm from each side).
2. Score the card down the middle (measure 10,5cm from each side)..JPG) 3. Fold card. Work out the centre point of the card and draw a 3,5cm line down the centre from the top.
3. Fold card. Work out the centre point of the card and draw a 3,5cm line down the centre from the top. .jpg) 4. Cut down your line (make sure you do NOT cut the BACK of the card!!) and fold the edges outwards to make the “collar of the shirt”.
4. Cut down your line (make sure you do NOT cut the BACK of the card!!) and fold the edges outwards to make the “collar of the shirt”..jpg) 5. Take your black card and cut two strips measuring 15x4 cm.
5. Take your black card and cut two strips measuring 15x4 cm..jpg) 6. Measure 3 cm down the long side of each piece and draw a diagonal line across to the other top corner (see photo for help. I have used a white pen so it would show up well in the photo).
6. Measure 3 cm down the long side of each piece and draw a diagonal line across to the other top corner (see photo for help. I have used a white pen so it would show up well in the photo)..jpg) 7. Cut off the corner pieces.
7. Cut off the corner pieces..jpg) 8. Use double-sided tape (you can use another glue of your choice but I find that things like Herma, which I always use for scrapping, don’t hold very well for cards) and attach the black pieces to the card. See photo for placement.
8. Use double-sided tape (you can use another glue of your choice but I find that things like Herma, which I always use for scrapping, don’t hold very well for cards) and attach the black pieces to the card. See photo for placement. .jpg)
9. Now let’s make the little pocket. Cut a 2x2 cm piece from black card and angle the bottom corners a bit (if you want).
.jpg) 10. Time to make the tie. Don’t get put off by how “complicated” it looks. We’re taking it one step at a time which makes this really easy. This is the type of sketch you will come up with in the end (see below). I find it’s easy if you draw this on a scrap piece of white card which you can use as your template for cutting your patterned paper. By the way, my lines ARE straight, but I often had to angle the camera so they don’t look straight just to get the camera to focus properly on the very white paper.
10. Time to make the tie. Don’t get put off by how “complicated” it looks. We’re taking it one step at a time which makes this really easy. This is the type of sketch you will come up with in the end (see below). I find it’s easy if you draw this on a scrap piece of white card which you can use as your template for cutting your patterned paper. By the way, my lines ARE straight, but I often had to angle the camera so they don’t look straight just to get the camera to focus properly on the very white paper. .jpg)
11. So grab yourself a piece of scrap white card and a pencil. I’ll be here holding your hand and talk you through this, so no need to “worry”. Start with drawing two vertical lines which are 2,1 cm apart. Easy? Yes! It won’t really get much harder than that.
.jpg) 12. Draw two lines across this (horizontal), 9cm apart. And then you draw one more line 1cm below the top line. Your piece should now look like this:
12. Draw two lines across this (horizontal), 9cm apart. And then you draw one more line 1cm below the top line. Your piece should now look like this: .jpg) 13. Draw a line 1,2cm above the bottom line.
13. Draw a line 1,2cm above the bottom line. 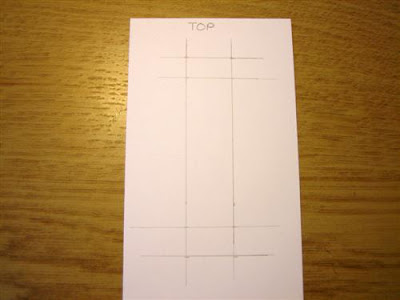.jpg) 14. Find the middle (from top to bottom) and draw a line. (This is between your two vertical starting lines).
14. Find the middle (from top to bottom) and draw a line. (This is between your two vertical starting lines). .jpg) 15. Now go to your very bottom line, find where the middle line crosses this and draw a diagonal line upwards and outwards to where the second line cross. See photo below – makes it so much easier than describing it in words.
15. Now go to your very bottom line, find where the middle line crosses this and draw a diagonal line upwards and outwards to where the second line cross. See photo below – makes it so much easier than describing it in words. .jpg) 16. Now go to the 2nd line from the top. Measure 3mm (millimetres) out from the centre on each side and draw diagonal lines down to meet the top of the lines you just drew in point no 15.
16. Now go to the 2nd line from the top. Measure 3mm (millimetres) out from the centre on each side and draw diagonal lines down to meet the top of the lines you just drew in point no 15. .jpg) 17. Go back to your 3mm markers and draw diagonally up and out to meet the top corners. (Again, see photo to make it so much easier).
17. Go back to your 3mm markers and draw diagonally up and out to meet the top corners. (Again, see photo to make it so much easier). .jpg) 18. Now we have almost finished it. The final thing you need to do is to go where the 2nd line from the top meets the centre line and measure 4mm up. Then go to the top line and measure 4mm in from each outer side. Draw diagonal lines up and out to these points from the marker you made on the centre line. See photo.
18. Now we have almost finished it. The final thing you need to do is to go where the 2nd line from the top meets the centre line and measure 4mm up. Then go to the top line and measure 4mm in from each outer side. Draw diagonal lines up and out to these points from the marker you made on the centre line. See photo. .jpg) 19. You have your tie template done! Now cut it out.
19. You have your tie template done! Now cut it out. .jpg) 20. Use your template to cut a tie from your chosen patterned paper. Also cut a little piece (pointed, like I did, if you like) to go inside the pocket you created earlier.
20. Use your template to cut a tie from your chosen patterned paper. Also cut a little piece (pointed, like I did, if you like) to go inside the pocket you created earlier. .jpg) 21. Now you can chalk the edges of the tie and your little piece of patterned paper if you like. I find this adds a lot of dimension to the card so I would recommend doing this. Finally attach to the card. Depending on how accurate you have been, and how you have folded the “shirt collar”, you might find that you need to trim of a little sliver of the inside “v”-shape on the top of the tie to make it “sit nice” under the collar. Test by holding in place before you glue it to the card. I have used a 3D glue dot to attach the pocket as I think it looks a bit more “natural” if the pocket is a little further out – but again this is optional.
21. Now you can chalk the edges of the tie and your little piece of patterned paper if you like. I find this adds a lot of dimension to the card so I would recommend doing this. Finally attach to the card. Depending on how accurate you have been, and how you have folded the “shirt collar”, you might find that you need to trim of a little sliver of the inside “v”-shape on the top of the tie to make it “sit nice” under the collar. Test by holding in place before you glue it to the card. I have used a 3D glue dot to attach the pocket as I think it looks a bit more “natural” if the pocket is a little further out – but again this is optional. .jpg) 22. And you’re finished! Now you can experiment with the design, make different ties…narrower or fatter, different types of jackets, different coloured shirts etc. Have fun and play!
22. And you’re finished! Now you can experiment with the design, make different ties…narrower or fatter, different types of jackets, different coloured shirts etc. Have fun and play! .jpg)
I hope you enjoyed making this card. Thank you for taking my class.
Anso
Anso


23 comments:
Wow, I love it! Such clear instructions too. It's my cousins birthday next week, maybe I'll try this out on him :D
Thanks for your classes - my friends all received one of 'your' exploding boxes for christmas and loved them (I did too!)
Can't wait to see what you'll suprise us with next!
Samm x
thanks anso - love these !! really easy instructions even for a frustrated-can't-put-up-an-ikea-flatpack-to-save-my-lifer like me - these will end up as my fathers day cards this year - thenks again !
Totally Fab Thanks for sharing :) Kind Regards Jackie
This is fantastic Anso, the instructions are really clear and easy to follow.
MJ xx
Great instructions Anso, you have a very imformative blog.
I love those cards, so classy & mens cards can be difficult.
Its great to see the amount of different countries you have on your counter.
Wow, looks great Anso, think that will be my brother's birthday card. Great way to use up small scraps for the tie. Love it. Thanks for sharing such good instructions.
Karen
love it plz make another class on card making they are so easy to understand and look really good
yhe shirt card will be good for fathers day
Thanks a million! Just made one of these for my Bro in law. Going to make a batch tomorrow for all males I know!!! thanks again. Instructions were great. x Neasa
bonjour de France, superbe anso et merci for sharing, really beautiful...
shirley
You certainly have mastered the simple instructions technique. Thank yoo for both the exploding box and male card. I haven't tried either one (I just found you website), but the instructions are so clear, I know they will be easy. Thanks Anso. Joan
I can't remember my google acc't info, so this may show up as anonymous. Not my choice. Thanks again!
Thanks it was so easy and quick to do. Excellent instructions. Also loved your exploding box. My friend and brother are now taken care off for their cards this year. Thanks again. Keep up the good work
Wow! Awesome tutorial. I have made a similiar card with more complicated instructions. Yours is a simplified version of the same card (well very similiar) and I love how quick & easy it looks. Will definately have to try this one.
Brilliant! I think I will be making a lot of these!
From one scrapbooker and cardmaker to another, Greetings, Anso~
Outstanding Class!
I'm am the owner-moderator of CrazyCardMakers yahoo group and one of our members posted your link to the Group. Many thanks for all the hard work you've done to provide excellent photos, clear instructions, and even a kind and encouraging word to those who might hesitate to try the tie sketch. :)
Your blog is a great resource for all cardmakers.
Anso -
I love your blog! I actually just found it because I was looking for the exploding box - and found your site. Thank you so much for the tutorials and dimensions.
I love this and the Maze Card. You rock! I am going to continue to visit and get great ideas from you. Thank you so much for everything you do.
Just made my first exploding box, delighted with the results. For someone like me who needs idiot proof instructions this was tremendous. Thanks
Val
nice post
When the Wow Gold wolf finally found the wow gold cheap hole in the chimney he crawled cheap wow gold down and KERSPLASH right into that kettle of water and that was cheapest wow gold the end of his troubles with the big bad wolf.
game4power.
The next day the Buy Wow Goldlittle pig invited hisbuy gold wow mother over . She said "You see it is just as mttgamingI told you. The way to get along in the world is to do world of warcraft gold things as well as you can." Fortunately for that little pig, he buy cheap wow gold learned that lesson. And he just agamegold lived happily ever after!.
I would like your permission to copy your "male card" instructions to use with my youth group of girls, who are preparing for a Dad/Daughter Dinner next month.
I posted on your daily blog, but I'm new at this - anyway, here's my email address (not anonymous!).
You have great ideas! And thanks for your super photos on all your entries!
smcpno@aol.com
Such clear instruction too....beautiful cards Glitter Advanced ....the embossing is stunning :D
custom credit cards
Nice way to use a card in different styles.
PVC cards
This is so cute! Thank you for posting instructions.
Love the card!
Post a Comment