Thursday, November 30, 2006

My Christmas Journal...

So excited about tomorrow! I'm doing Shimelle's Christmas Journal class which starts on Dec 1st. I have done her last two classes and really enjoyed them. Also I just love Christmas so I think this will really suit me.

I have spent the last two days making my own journal. It is landscape 15x20 cm (or for those of you who work in inches - 6x8)...well, that is the pages are that size...the album covers are just a tad bigger. Figured this was a great size if I wanted to use 15x10cm (6x4) portrait photos. The photos would fit perfectly to one side of the page and the other side would be left for journaling.

I made my own journal from scratch. Each cover is made up of 4 pieces of card (cut to size) and glued together. Then I have used Basic Grey Blitzen to cover both the inside and outside of each piece. The insides have cute little reindeers jumping about! LOL!

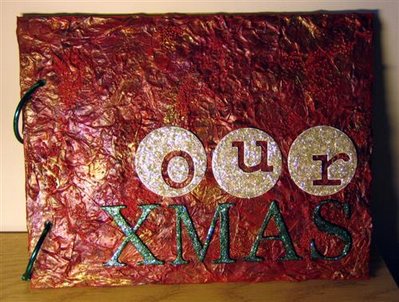
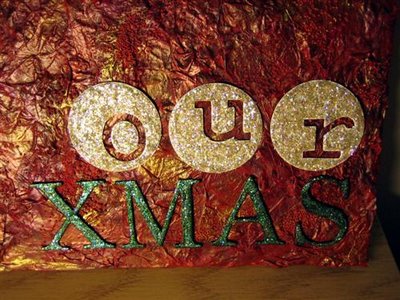
Then I covered the front of the front cover (if you know what I mean) in Mod Podge and lots of ripped up tissue paper and then more Mod Podge. (Thanks to Clare for some great hints and tips on how to do this!) I added some micro beads in random places and left it to dry overnight...

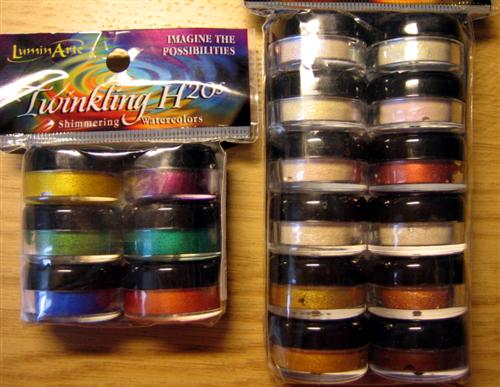
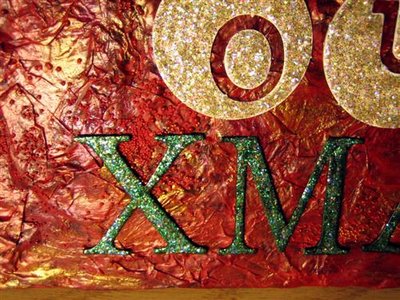
When it was finally dry, I painted the whole cover with red acrylic paint. Again let that dry. And then added lots of Twinkling H2Os randomly everywhere (reds, bronzes, coppers and golds). Finally onto the title. It's just plain chipboard letters painted with acrylic paint and then lots of Stickles glitter glue! Unfortunately the photos don't do the album justice at all. It's the most textured surface you can imagine which shimmers beautifully under the lights and the title sparkles in a rainbow of colours...

Wednesday, November 29, 2006

Another card dare...

...just finished card dare #6. You had to create a card using some hand doodling. My card for this week is quite simple really. A bit of Basic Grey paper, some Rusty Pickle and Hero Arts stamps, silver ric rac, inks, a black pen and some silver Stickles glitter glue (unfortunately the sparkle doesn't really show up in the photo).


Today I'm also working on making my album for Shimelle's Christmas class (I started yesterday). I'm making my album from scratch so it's taking some time. Lots of Basic Grey and Mod Podge etc. Oh and some glittered chipboard letters! That's all I'm saying for now. LOL! At the moment my album is drying and I hope to be able to add a photo of it here tomorrow. I feel rather excited about starting the class on Dec 1st!! Can't wait in fact...

Can I also say a big THANK YOU for all the nice comments about my "Exloding Box" class - that means a lot! :) Thanks! I realise that as I add new posts, the class will disappear further and further down. So I have added a link straight to it for anyone who wants to come back to it later. You should see it listed on the right hand side of this page. Have fun!

Tuesday, November 28, 2006

"Exploding Box" Class...

Exploding Box Class - "An Exploding Year" - by Anso

Please feel free to use these instructions to make your own boxes. You are free to link to this page from any forum etc if you wish. Please do NOT copy this information and/or photos to use for your own classes/forums/webpages without permission. Please also note that I'm not claiming that I have invented the exploding box, but these simple step-by-step instructions and photos are mine.

Class Supply list:


For the box you will need:
* 3x 12x12 sheets of cardstock

For the lid you will need:
* 1x 12x12 sheet of cardstock (though this can be A4 also, you only need a 6 ¼”x6 ¼” piece)

Tools:
* trimmer
* scissors
* scoring tool, like a bone folder etc, or the scoring blade if you have a Zision trimmer or similar
* glue (I would recommend double-sided tape PLUS a wet glue like Glossy Accents, Diamond Glaze etc)
* 4 paperclips (to hold card in place while drying) – optional
* corner rounder – optional
* inkpad for edges of card - optional

I would recommend that your four sheets are either exactly the same colour, or different shades of the same colour. Of course, if you want more of a rainbow effect (!) you could use four sheets of totally different colours. I have used two different shades of green Bazzill. The class with mainly focus on how to make the exploding box itself. However I will also supply some photos of my finished box.

If you wish to continue after the class and decorate your box you will need: about 5-6 sheets of co-ordinating patterned paper (assuming you want to cover the “pages”) up to 26 small photos (assuming: one on each “flap”(front and back), one in the middle of the box and one on the top of the lid) ribbon to go around the lid (optional) any other embellishments etc that you want to use. The class is called “An Exploding Year” because my box will feature “random” photos from the past year…so it’s kind of like a summary of a “year in a box”.

First of all – please don’t be put off by how long the instructions are. It’s only because I have made them VERY simple and step-by-step with lots of pictures. Making the box and lid (not decorated) only took me 30 minutes. And then I had to stop all the time to take photos of the different stages.

Normally I work in metric, but for making this box it’s actually easier to make it using inches…so that’s what we’ll do. Ready?

1. First we’ll do the box itself. Take your three sheets of cardstock and cut them as follows:

• one sheet to 9 x 9 inches
• one sheet to 8 5/8 x 8 5/8 inches
• one sheet to 8 ¼ x 8 ¼ inches


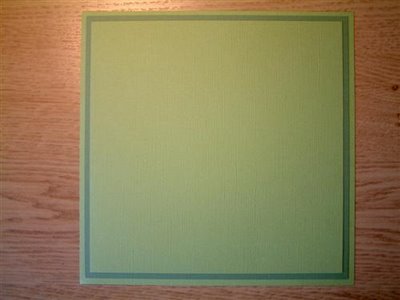
2. Now score each sheet according to the measurements below. You score on all four sides (see photo below).

• score the 9 x 9 sheet, 3 inches in from each side
• score the 8 5/8 x 8 5/8 sheet, 2 7/8 inches in from each side
• score the 8 ¼ x 8 ¼ sheet, 2 ¾ inches in from each side


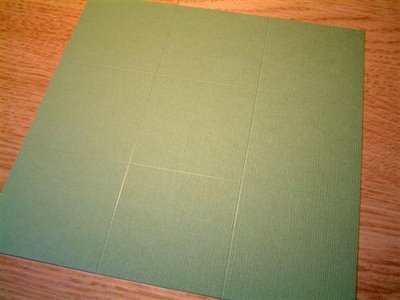
3. Following your scored lines, cut off all four corners on all three pieces.


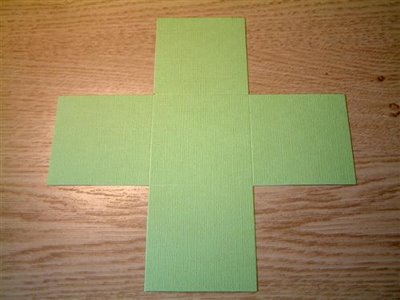
4. At this point (and this is optional) you might want to ink the edges (don’t forget to do both sides!) and/or round the corners.


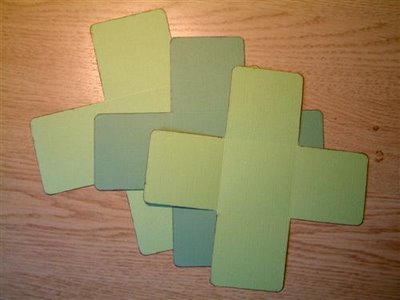
5. Now you need to glue together your pieces. It’s easiest if you start by putting the smallest piece on to the middle piece and then the medium (+smallest) piece onto the largest one. I would suggest you use double-sided tape for this. You ONLY put your tape/glue on the MIDDLE square. Like this:


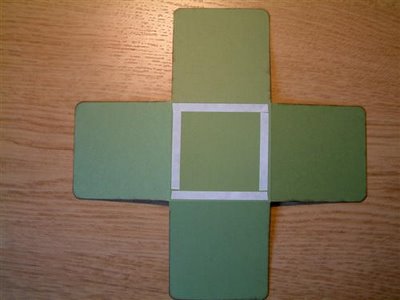
…and don’t forget you do NOT need glue on the back of your largest piece. Once you have put them together, you should end up with something looking like this:


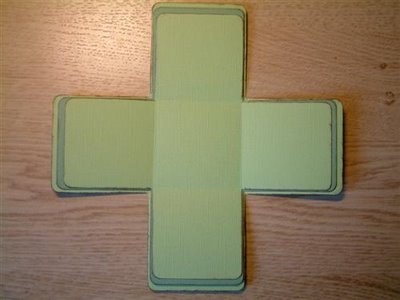
6. Fold up the edges of your scored lines.


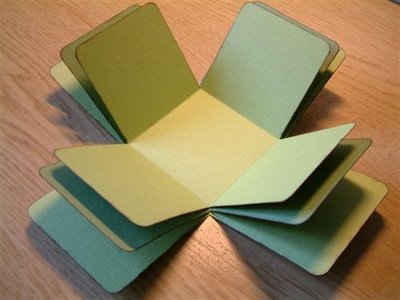
7. Now you can put the box to one side. It’s finished for you to continue decorating now or later. Onto the box lid:

8. Take your piece of cardstock for the lid and cut it to: 6 ¼ x 6 ¼ inches

9. Now score the lid, 1 ½ inch in from each of the four edges.


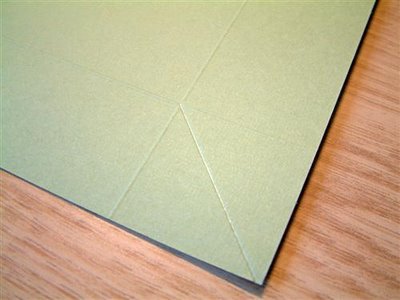
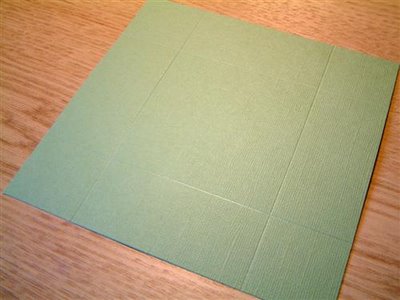
10. Right, this might be a bit tricky to explain in words, but the photo below should help you. TURN YOUR CARD OVER and you need to score from the tip of each corner, diagonally, until you meet your scored “corner” lines. See photos:


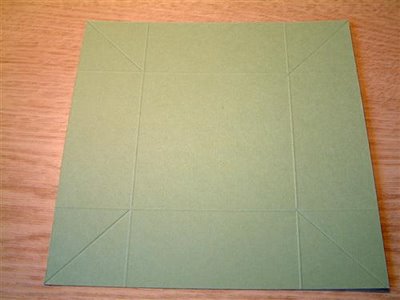
11. Fold all your scorelines and pinch the corners and fold them inwards. See photo:


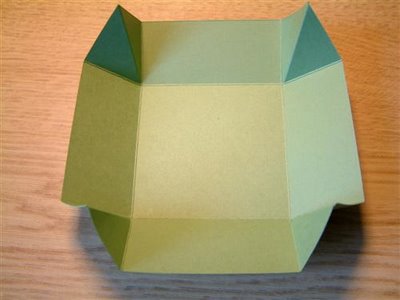
12. Glue the corners in place. I found that double-sided tape was NOT strong enough for this (it holds for a little while and then lets go) so I would recommend a wet glue, something like Glossy Accents or Diamond Glaze for this. You can either hold the corners for a little minute until the glue is dry enough to hold the corners in place, or you can use some paperclips to hold the corners in place while drying.


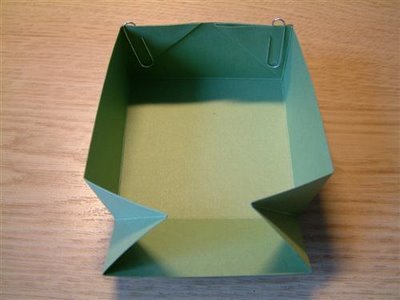
...your lid should now be finished and look like this:


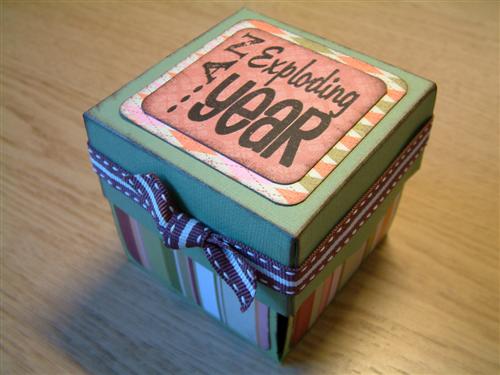
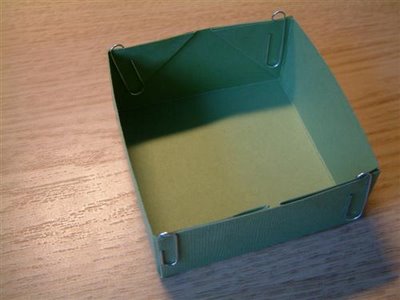
And your finished complete box should look something like this:


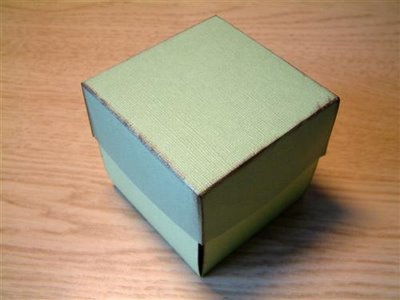
If you want to continue decorating your box, I would recommend the following measures for your paper (I’m swapping to metric now since it’s easier to be more exact):

• one 7,5x7,5 centimetre square for the top of the lid
• one 6,5x6,5 centimetre square for the centre inside your box

• eight 7x7cm squares for your largest “pages”
• eight 6,7x6,7cm squares for your medium “pages”
• eight 6,5x6,5 cm squares for your smallest “pages”

Round your corners and/or chalk your edges if wanted.

I have used Chatterbox papers for mine and this is what my box looks like decorated:


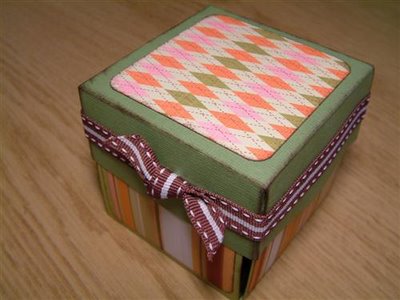
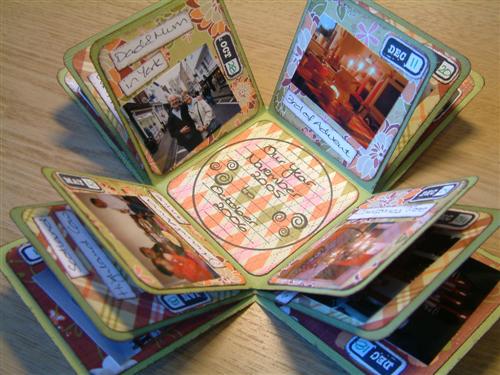
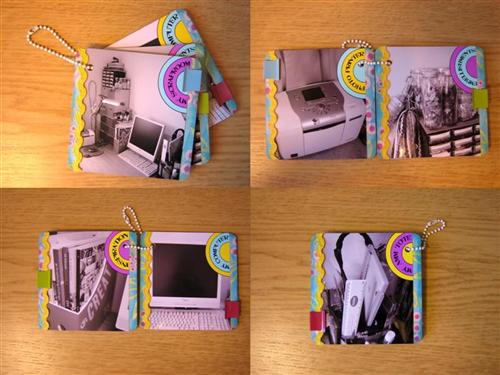
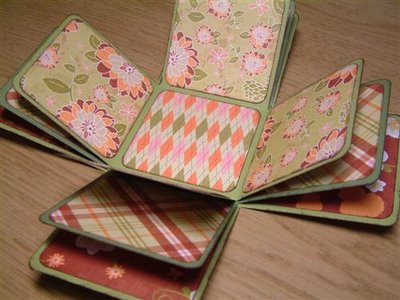
I have used small photos in mine. I used 20 photos in my box. One on each page (not on the lid, centre square, or the four sides that makes up the outside of the box) and I printed my photos: 8 photos to a 15x10cm photo (6x4 inches). Very easy if you have an Epson PictureMate. Each little photo measures: 5x4 cm.

And here is my finished box:


I hope you have enjoyed my class and thank you so much for taking it!

Anso

Monday, November 27, 2006

The "Exploding Box"...

What a weekend of scrapping it was! Not sure how many LOs I got done, but I have got quite a bit of a pile of them here. Makes you feel good! But I think it will take me a little while to recover LOL! I feel generally worn out today, my head is a bit achy and fuzzy, my eyes runny and my nose tickly. And I feel like my brain is worn out LOL! A bit like "Creativity?" ----> "What's that?" LOL!

I had been rather worried about the "Exploding Box" class that I did for the ScrapPad cybercrop. But I didn't have to be worried - thanks to all the girls who said such nice things about my class. I had spent hours and hours planning, taking photos and trying to make my class as simple as possible. So all the comments I got about how clear and easy it was meant a lot. Thank you!

I have had several requests of making the class "permanent" (sooner or later it will be removed from the forum), not to mention PMs from other people on other forums, reading my blog and wanting to do my class. So I have decided to try and put my class on my blog, where it would stay.

It's very much a step-by-step class with 18 (!) photos, so it should be very easy to follow for everyone I think. I will spent today trying to sort it out and work out how I will get it on my blog, and I hope (maybe already tomorrow) I can get my class on here in the next few days. So please check back for that...

Saturday, November 25, 2006

Cyber crop mania...

Scrapping like crazy today - trying to do two cyber crops at once! Oooh is it fun, but ouch my back and shoulders hurt already! LOL! Still, you get lots of layouts done which it always good. Plus you might get to try techniques and ideas that you don't normally use.

This is a layout I just finished for a class by Shimelle. I really enjoyed this (thanks Shimelle if you're reading this!) As usual for me with cyber crop classes, I never really read the class instructions. Instead I just look at the photo of the finished layout and let that inspire me to create. I find, for me, that is the best way to do it. Usually you end up making something you really enjoy while at the same time you keep some of your own style...

Friday, November 24, 2006

What a day...

...it's been. I feel like I have not had time to breathe. Had lots and lots of things to get done before the weekend's two cybercrops as it was anyway. Then BIG problems occured on the Pad forum. Debbie's moved and got no internet access. The problem? She's got half of the stuff for the crop!! Panic!

So I had to spend this morning scrapping as fast as I possibly could to make another class page and get a supply list and instructions written for it. Fortunately it's now done. I have also got all the instructions and photos (18!! Very step-by-step!) done for my "Exploding Box" class and that's been uploaded to a hidden place on the forum now too.

Before I went to bed last night I wrote a long "to do" list of everything I wanted to have done before the UKScrappers crop starts tonight (the ScrapPad one is Saturday only) and I can finally say I have got the list down to 4 things now. So things are starting to feel a little better now.

In the next few days I should - hopefully - have some new layouts to show you which I will be doing during the crops...

Thursday, November 23, 2006

Twinkle, twinkle...

...well that's what my projects will be doing soon! The people on ScrapPad are such a bad influence (okay, so I don't really mean that of course, but...LOL!) So many people have suddenly been going mad about Twinkling H2Os that I just had to try them. Ordered some yesterday morning (#651, #654, #655, #656) and they arrived about an hour ago. Great service!

...I actually ordered four sets (one set = 6 pots), but one was marked as "to follow", so we'll see when that turns up. Have e-mailed them and asked approx how long it will be. Can't wait to have a play with them!!

Question to all you Twinkling-H2O-fans out there...which sets do I need next...? LOL!

Will be spening this afternoon sorting out all my photos for my ScrapPad cyber crop class on Saturday. Picking them, editing, resizing etc. Have been given access to a locked thread where I can prepare and upload it all, so I hope to be ready to do that tomorrow sometime.

It will be a very, very, very busy scrapping weekend this weekend. Cyber crop on ScrapPad on Saturday and on UKScrappers on Fri/Sat/Sun. Some serious multitasking will happen on Saturday me thinks...LOL!

Wednesday, November 22, 2006

More ATCs...

Got some more ATCs done for the Christmas swap this morning. Pinks and lilacs...not something I use very often (!)...but I was rather happy with the end result anyway. Again I used my new Rusty Pickle stamp set - so useful and the text stamps fit so perfectly with the ATC size. Lots of inking and Stickles glitter...

Please meet my new green Ipod Nano and the cute green iPod sock! I'm sooo happy with it!! :) Still got lots to learn about it and iTunes. But at least I have got it charged and got some music on it already, which is great. Love the sound quality - it's just great! I even managed to put some photos on it last night and I was very impressed with how well the screen showed them.

I just looove these little iPod socks. They might be rather pricey for what they essentially are (a bit of knitting!) but they are sooo cute and cushions the iPod nicely, not to mention makes it easier to pick up and grip in your hand. Now you don't (can't - I believe) buy these iPod socks in singles. But you get a whole pack of six different colours...

Rather nice I think, to have different colours to swap with. You could even go a bit crazy and co-ordinate with something you're wearing...or just swapping to another colour because you want a change. Apart from the green one, you get a nice bright pink one, a bright turquoise, a grey, an orange (with yellow at the top) and a colour which it's difficult to say if it's dark blue or dark purple...so I guess that makes it ---> a dark bluey-purple LOL! The colours are showing up pretty real on my screen. And no Apple is sadly (I wish!) not paying me any commission for this...

Tuesday, November 21, 2006

ATCs...

Well they arrived!! I got my Brilliance inkpads yesterday afternoon with the parcel van. They are so cute and such great colours! The only thing I'm kinda regretting is not getting a proper red and a pearlescent white...but then again, the places I ordered from didn't have them in stock I think LOL!

I already had a little play with the green one. I have spent the morning making ATCs for a swap on ScrapPad. I used the geen one for the Christmas trees and I'm really pleased with the result of the ink. Managed to do 9 ATCs for the swap this morning. Will see if I can do another few another day maybe...

The ATCs are all done using my brand new stamps from yesterday too. Paper Artsy and Rusty Pickle. Lots of Tim Holtz distress inks, chalk ink and some Stickles crystal glitter glue for the borders (quite hard to see in this small photo - sorry).

Feel a bit like I'm getting a cold today...a bit of a sore throat, tickly nose and generally a bit chilly. Hopefully it's just one of those things that doesn't actually turn into a cold and is gone by tomorrow...

Monday, November 20, 2006

Happy Birthday...

...to me! LOL! Got some great presents from Ross and my brother & sister in Sweden!! I'm a very lucky girl! And there will be cake when Ross gets back home this afternoon too. Here's a photo of my little birthday teddy:

Also mum and dad sent me money to buy an iPod Nano (would be silly to post one all the way from Sweden). So right now I'm searching websites for the best deal. Guess which colour? LOL! I'm rather keen on those cute little iPod socks too...might have to get them also. After all, I do NEED something to protect it with, right? LOL!

This is a little minibook I made about 2 weeks ago. Made from "chipboard" beermats (glass coasters), lots of Basic Grey, inking (oh I love my Tim Holtz distress inks!!), ric rac etc. Just a little book to show a few parts of my little "craft cave" (for those who don't already know, I call my little room a "cave" because it's sooo tiny - not even long enough to fit a single bed!)

Sitting here hoping that the post van might turn up with my Brilliance ink pads that I ordered on Thursday. Got the normal post already (wow that was "early" for us) and didn't get them then. I'd really like to have a play with them today. Might do something small like a few ATCs or something...not done that for a while. If they arrive...

Sunday, November 19, 2006

Well, I got some Christmas cards done for the guest DT on Friday so I was pretty pleased with that. Hope to come up with some more things to make next week. Also I managed to do the new cardmakers dare #5. To design a card for a male person using some ribbon. This is what I came up with:


Dark brown cardstock as the base. Some scrap blue patterned paper (which I had already cut off the piece with the name on, so I have no idea about the brand - sorry). I used my sewingmachine to make a border around the card. Stamped my image onto baby blue card, used some crystal Stickles on the glasses and made a border around the image with some chalk ink and glossy accents...

I added the ric rac at the top of the paper and finally I finished off the card by punching three holes on the left side near the top (sorry, almost impossible to see in the photos) and added three lots of ribbon.

Now, time to see if I can get a layout or two done for the UKScrappers Design Team. Can't believe it's the final month...

Friday, November 17, 2006

Busy, busy, busy...

Got so much to do, with DT deadlines and two cyber crops coming up next weekend etc, that last night I took the decision to sell my UKScrappers "Mystery" cyber crop kit. I just realised I wouldn't have time to use it before the crop, so it made sense that someone else could have it instead. It sold within 2 minutes!

Since it's my birthday on Monday, I decided to use the money from the kit to treat myself to some new Brilliance Dew Drop inkpads and some stamps. Everyone has been raving about how good they are on ScrapPad so I had to try some. And they look so cute!! Can't wait for them to arrive...

I managed to finish the class I'm doing for the ScrapPad cyber crop yesterday. But I have still got all the photos to sort out and pick (to show the project as it goes along) and to write the instructions. But that will have to wait until another day...probably next week...

Today I will be busy, busy, busy making Christmas cards for a guest DT. Maybe I'll even manage something more than that. We'll see how far I get...

As always: thanks for reading...

Thursday, November 16, 2006

Oh well...

After an emergency appointment at the dentist this morning I'm feeling a little sorry for myself (and sore from the dentist visit) today. A bad back and an upset stomach doesn't make you feel any better. Oh well...

Tried to take my mind off it by trying to catch up on the previous cardmaking dares. This is for dare #2. Your challenge was to use something from the kitchen:

Love my sewing machine so I decided to get that out. Card and papers are chalked and sewn together using zig zag. I have used an up-side-down bottle top as the centre of my flower and filled this with lots and lots of Stickles glitter glue (the BEST glitter glue available in my opinion!!)...and to finish it off I added some random "blobs" of glitter glue onto some of the flower petals too.

And do you know what the best thing is? I only used scraps of paper/card for this. There's just something about that which makes you feel really good...

Wednesday, November 15, 2006

A thank you to you...

Been working on my UKScrappers Design Team kit yesterday and today. A very nice kit! It's very bright and Christmassy (is that a word?!). The Christmassy bit I love...the bright bit...well it's a bit new to me. But I'm enjoying the challenge and I have to say I rather like the result even if it's bright. LOL! Got a layout done yesterday and hope to do (or at least start) another one today.

Also I'm busy preparing a class for the ScrapPad forum cyber crop. Got the supply list sorted and sent in yesterday and hope to get the chance to continue working on it today. I can't say too much about it yet (will show a photo when I can/it's gone live), but there's definitely some green (!!) involved...and some yummy Chatterbox papers!

Talking about Design Teams... This is a layout which I made for a DT submission. But it wasn't to be. So here it is now:

I really enjoyed doing this layout. It's possibly my favourite photo of the summer. Taken at the beach near my parents' summer house in Sweden. My brother and his girlfriend were sitting down by the water and it just looked like the perfect photo, so I took it without them being aware of it. Sometimes that's when you get the best photos...

And can I please finish today with a message for all of you: I have thought a lot during the last few months (!) about starting a blog. Back and forth, back and forth... To be honest I had no idea if anyone would even read it. So I'm so very grateful for your visits. And the comments really mean a lot! Please keep them coming - they put a smile on my face. THANK YOU!!! And to Gillian: thanks for what you said about enabling "word verification" on the comments, I think I have got that sorted now...

Tuesday, November 14, 2006

Card dare and magnets...

Finished this week's card making dare yesterday. This week's challenge was to create a card using a foreign language. Suited me perfectly! Though Ross' suggestion made me laugh, he said I should have done my card in English since that is not my first language! LOL! Anyway, here's what I came up with...


...and for those of you who can't read Swedish: "Grattis PÄ Födelsedagen" means "Happy Birthday". Tri-folded my card, sliced off the top diagonally, added some Basic Grey papers and buttons. Quite enjoyed doing a card in a different shape...

On Sunday we went to IKEA (being Swedish, I just loooove the Sweden Shop at the end!) and I got a little magnetic board to put all my notes on. Bought some magnets too, but they looked rather boring and plain:


...so I ended up decorating some of them a bit. Might have got a bit crazy by making them so bright...but hey, at least they make you smile when you look at them, which is the main thing. And the magnets themselves were so cheap that if I get tired of them it's not the end of the world to throw them and buy some more.

I got some exciting post yesterday afternoon. Two pizzaboxes with stash were delivered. One was the mystery kit for the UK Scrappers cybercrop in two weeks. Since it's a secret kit, I guess I'm not allowed to say what's in it...but let's just say the colours didn't surprise me. Some of the papers inside I really, really like - so I'm sure I can make something out of that.

The other box contained a very cool DT kit. I've been asked to be a guest member of a DT. Not sure how secret or not it is, so I better not mention who for just yet. You'll find out in about a month's time... Anyway, I'm really excited about it (and feel very honoured to be a guest DT member!!) and can't wait to have a play with the goodies.

Monday, November 13, 2006

Welcome to my little blog...

Thanks for stopping by to have a look at my blog! Feeling rather "nervous" typing the very first message LOL! Kinda like you don't want to mess up...even though I don't know what there is to mess up...

Made Christmas cards with my boyfriend Ross on Saturday. That was lots of fun! Even though he said he would help me, I just had this feeling that he would change his mind in the last second. But no. Great! I had already made a "Christmas card prototype" earlier in the week, so it was just to get started. And the result is this:

I made the template for the card myself (green cardstock). And then added the brown trunk and the stripe of paper accross the tree. Took aaages to cut all the paper into little strips and get it all to line up prefectly. LOL! Finished off with some Stickles glitter glue and some fine red and silver ribbon.

And before I go, I need to tell you that I'm in button heaven!! Look what Ross bought for me yesterday:


I keep running out of buttons for my scrapping and I just looove the flat, round, matte buttons so much!! There are some really cute tiny buttons in there too (you can just about see them at the top of the photo) which I'm sure will come in very useful. Just a shame there are no green tiny ones....

Thanks for reading. Hopefully if you got this far you quite liked it, so I would love to see you back here tomorrow. I'd be very, very grateful to any of you who want to bookmark my site, or maybe even link it from your own blog. Thanks!